
The Simply Blue Round Scatter Cushion is a modern, beginner-friendly crochet pillow designed to build confidence while creating a stylish home décor piece. This super easy tutorial uses only the double crochet stitch, is worked in the round, and features simple color changes for a bold yet minimal look.
If you’re new to crochet or want a relaxing, no-stress project, this round cushion is the perfect place to start.
35% Raverly Sale
About This Pattern
Hook Size : 3 mm
Finished Size : Approx. 50cm diameter
Skills Level : Super Easy
Stitches Skills Level : only Double Crochet Stitch used

Pattern Overview
- Skill Level: Super Easy
- Stitch Skill Level: Double Crochet only
- Technique: Crochet working in the round
- Finished Size:Approx. 50 cm (20 in) diameter
- Hook Size: 3 mm

Materials & Tools
| Hook | 3mm Crochet Hooks |
|---|---|
| Yarn Weight | Double Crochet (DK) Cotton Yarn |
| Fibre Type | Cotton–Acrylic Blends |
| Other Tools | |
| Yarn Needed | Materials used in this pattern
|
| Finished Size | Approx. 50 cm (20 in) diameter |
Materials
- Crochet Hook: 3 mm
- Yarn Type: Super Soft 100% Cotton
- Yarn Weight: Approx. 135 m / 147 yards per 50 g skein
Yarn Colors Used
1 × Denim (50 g)
1 × Charcoal (50 g)
1 × Thunder (50 g)
1 × London Sky (50 g)
1 × Cyan (50 g)
1 × Jet Black (50 g)

Yarn Note:
The pattern uses approximately half of the total yarn per side, meaning the skeins listed above will complete one full cushion (front and back panels).
Yarn Calculator
Not sure how much yarn you'll need for your next crochet project?
Use our yarn calculator to estimate the amount of yarn required based on your project size, yarn weight, and stitch pattern.
It's a quick and easy way to plan your materials before you start crocheting.
Pattern Instructions
Resizing Guide
Resizing Guide : Make Your Cushion Bigger or Smaller
This round cushion is very easy to resize. You can change the size by working more or fewer rounds or by using a different yarn weight.
Resizing by Adding or Removing Rounds
- For a smaller cushion, stop after fewer rounds (for example, Round 16 or 18).
- For a larger cushion, continue increasing in the same pattern beyond Round 20.
How to continue the pattern:
- Each new round adds 12 stitches.
- Increase by working 2 double crochets in the next stitch, then 1 double crochet in each stitch until the next increase.
- Each round adds one more stitch between increases than the previous round.
Example:
Round 21: *1 dc in next 19 sts, 2 dc in next st*, repeat around
Round 22: *1 dc in next 20 sts, 2 dc in next st*, repeat around
Always finish with the same number of rounds on both the front and back panels.
Resizing by Changing Yarn Weight
- Lighter yarn (fingering or sport weight):
Creates a smaller cushion with a finer, softer texture. - Medium-weight yarn (DK or worsted):
Makes a larger, thicker cushion with more structure. - Chunky yarn:
Produces a bold, oversized cushion with fewer rounds needed.
Beginner Tip:
When changing yarn weight, use a hook size recommended on the yarn label and stop increasing when the cushion reaches your desired diameter.
Keeping the Cushion Flat
- If your circle ripples, you may be adding too many stitches.
- If it cups or curls, try loosening your tension or adding one extra increase round.
This resizing flexibility makes the pattern perfect for cushions, floor pillows, or even round seat pads.
Written Instructions
How to Make a Magic Ring (Beginner-Friendly)
The magic ring (also called an adjustable ring) allows you to start crocheting in the round without leaving a hole in the center.
Simple Steps:
1. Wrap the yarn around your fingers to form a loop.
2. Insert your hook into the loop and pull up a loop.
3. Chain 2 (this counts as your first double crochet).
4. Work all required double crochets into the ring.
5. Pull the yarn tail gently to close the center.
Beginner Tip:
If the magic ring feels tricky, you can substitute it with chain 4 and slip stitch to form a ring.
Working in the Round – Beginner Tips
Always place a stitch marker in the first stitch of each round.
Count your stitches at the end of every round to keep the circle flat.
If your circle starts to ripple, you may be adding too many stitches.
If it starts to curl, you may need to loosen your tension slightly.
This cushion increases evenly, making it ideal for learning how round crochet grows naturally.
Joining Colors for Beginners
Color changes in this cushion are clean and simple.
Easy Color Change Method:
1. Complete the final yarn-over of the last double crochet with the new color.
2. Pull through to finish the stitch.
3. Continue crocheting with the new color as normal.
Beginner Tip:
Carry yarn neatly along the back if switching colors frequently, or fasten off and weave in ends for a cleaner finish.
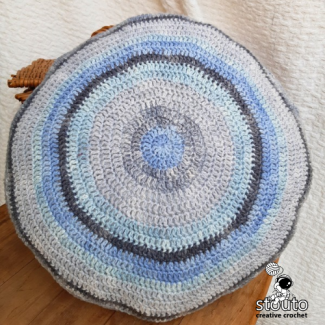
Color Options for a Super Easy Round Crochet Pillow
This design works beautifully with many color styles:
- Monochrome: Different shades of one color for a calm, modern look
- Coastal:Blues, whites, and soft greys
- Bold Statement: High-contrast colors like black, mustard, and teal
- Neutral Home Décor: Cream, beige, charcoal, and soft brown tones
Choose smooth, solid colors to keep the stitch pattern beginner-friendly and visually clean.
Joining the Front and Back Panels (Simple Assembly)
Once both round panels are complete:
1. Place the wrong sides together.
2. Align stitches evenly around the edge.
3. Join yarn in any stitch.
4. Work slip stitches or single crochets evenly around to join both panels.
5. Leave a small opening for stuffing.
This joining method creates a clean, modern edge with minimal effort.
Filling and Stuffing Your Crochet Pillow
- Use polyester fiberfill or a ready-made round cushion insert.
- Stuff evenly, pushing filling gently toward the edges.
- Avoid over-stuffing to keep the cushion soft and flat.
- Once filled, continue joining stitches to close the opening securely.
Pro Tip:
Lightly shape the pillow with your hands after closing to distribute filling evenly.
Why This Pattern Is Perfect for Beginners
- Only one stitch to learn
- Simple, repeatable rounds
- Easy color changes
- Minimal shaping and assembly
- Modern, usable finished project
Pattern Reference
This page is part of a larger crochet pattern and is intended as a companion tutorial or stitch reference. For complete instructions, materials, sizing information, and all pattern sections, please visit the main pattern page.Step by Step
⚠️ This pattern is for personal use only. Please do not copy or redistribute.

Free Crochet Pillow -Beginner Pattern
Round 1
Make a magic ring.
Work 12 double crochets into the ring.
Join with a slip stitch to the first stitch.
(12 sts)
Round 2
Ch 2, 1 dc in the same stitch.
*2 dc in the next stitch* — repeat from * to * around.
Join with a slip stitch to the top of the starting ch-2.
Fasten off.
(24 sts)
Round 3
Join new color with a standing slip stitch in any stitch.
Ch 2, 1 dc in the same stitch.
*1 dc in the next stitch, 2 dc in the next stitch* — repeat around.
Join with a slip stitch.
(36 sts)
Round 4
Ch 2, 1 dc in the same stitch.
*1 dc in the next 2 stitches, 2 dc in the next stitch* — repeat around.
Join with a slip stitch.
Fasten off.
(48 sts)
Round 5
Join new color with a standing slip stitch.
Ch 2, 1 dc in the same stitch.
*1 dc in the next 3 stitches, 2 dc in the next stitch* — repeat around.
Join with a slip stitch.
(60 sts)

Round 6
Ch 2, 1 dc in the same stitch.
*1 dc in the next 4 stitches, 2 dc in the next stitch*, repeat around.
Join with a slip stitch.
(72 sts)
Round 7
Ch 2, 1 dc in the same stitch.
*1 dc in the next 5 stitches, 2 dc in the next stitch*, repeat around.
Join with a slip stitch.
Fasten off.
(84 sts)
Round 8
Join new color with a standing slip stitch.
Ch 2, 1 dc in the same stitch.
*1 dc in the next 6 stitches, 2 dc in the next stitch*, repeat around.
Join with a slip stitch.
(96 sts)
Round 9
Ch 2, 1 dc in the same stitch.
*1 dc in the next 7 stitches, 2 dc in the next stitch* ,repeat around.
Join with a slip stitch.
(108 sts)
Round 10
Join new color with a standing slip stitch.
Ch 2, 1 dc in the same stitch.
*1 dc in the next 8 stitches, 2 dc in the next stitch*, repeat around.
Join with a slip stitch.
(120 sts)
Round 10
Join new color with a standing slip stitch.
Ch 2, 1 dc in the same stitch.
*1 dc in the next 8 stitches, 2 dc in the next stitch*, repeat around.
Join with a slip stitch.
(120 sts)
Round 11
Join new color with a standing slip stitch.
Ch 2, 1 dc in the same stitch.
*1 dc in the next 9 stitches, 2 dc in the next stitch* , repeat around.
Join with a slip stitch.
(132 sts)
Round 12
Ch 2, 1 dc in the same stitch.
*1 dc in the next 10 stitches, 2 dc in the next stitch* , repeat around.
Join with a slip stitch.
Fasten off.
(144 sts)
Round 13
Join new color with a standing slip stitch.
Ch 2, 1 dc in the same stitch.
*1 dc in the next 11 stitches, 2 dc in the next stitch* , repeat around.
Join with a slip stitch.
Fasten off.
(156 sts)
Round 14
Join new color with a standing slip stitch.
Ch 2, 1 dc in the same stitch.
*1 dc in the next 12 stitches, 2 dc in the next stitch* , repeat around.
Join with a slip stitch.
(168 sts)
Round 15
Ch 2, 1 dc in the same stitch.
*1 dc in the next 13 stitches, 2 dc in the next stitch* , repeat around.
Join with a slip stitch.
(180 sts)
Round 16
Ch 2, 1 dc in the same stitch.
*1 dc in the next 14 stitches, 2 dc in the next stitch* , repeat around.
Join with a slip stitch.
Fasten off.
(192 sts)
Round 17
Join new color with a standing slip stitch.
Ch 2, 1 dc in the same stitch.
*1 dc in the next 15 stitches, 2 dc in the next stitch* , repeat around.
Join with a slip stitch.
Fasten off.
(204 sts)
Round 18
Join new color with a standing slip stitch.
Ch 2, 1 dc in the same stitch.
*1 dc in the next 16 stitches, 2 dc in the next stitch*, repeat around.
Join with a slip stitch.
(216 sts)
Round 19
Ch 2, 1 dc in the same stitch.
*1 dc in the next 17 stitches, 2 dc in the next stitch*, repeat around.
Join with a slip stitch.
(228 sts)
Round 20
Ch 2, 1 dc in the same stitch.
*1 dc in the next 18 stitches, 2 dc in the next stitch* . repeat around.
Join with a slip stitch.
Fasten off.
(240 sts)
Finishing the Pillow
Make the Front and Back Panels
Crochet two identical round panels.
Repeat Rounds 1–20 for each panel.
Fasten off and weave in all loose ends on both pieces.
Joining the Two Panels
1. Place the two panels wrong sides together, with the right sides facing outward.
2. Align stitches evenly around the edge.
3. Join yarn in any stitch.
4. Using either:
- Slip stitches for a flat, minimal seam, or
- Single crochet stitches for a slightly raised edge, work evenly around the panels to join them together.
5. Stop when there is a 10 cm (4 inch) opening remaining.
Turning and Stuffing
1. Turn the pillow right side out through the opening.
2. Gently push out the edges so the circle is smooth.
3. Stuff the pillow evenly using polyester fiberfill or a cushion insert.
4. Do not overfill, the pillow should be firm but still soft.
Closing the Gap with a Blanket Stitch
1. Thread a yarn needle with matching yarn.
2. Use a blanket stitch to neatly close the remaining 10 cm opening.
3. Pull stitches snug but not tight to maintain the round shape.
4. Fasten off securely and weave in ends.
Beginner Tip
After closing the pillow, gently shape it with your hands to distribute the filling evenly and smooth out the edges
What Other Crocheters Say
This pattern hasn’t been reviewed yet.
Be the first to share your experience and help other crocheters.
Made it work? Share your result
Post a ReviewPattern Copyright & Usage
This crochet pattern and all associated content are the original work of Stouto Crochet.
- ✔️ Personal use allowed
- ✔️ Sell finished handmade items (small-scale)
- ❌ Do not copy, rewrite, or redistribute
- ❌ Do not share or resell PDF patterns
AI & Content Use: This pattern may not be reproduced or used to train AI systems.
Explore More Crochet Tutorials on the Website
If you need extra help while working on your stitch sampler blanket, you can explore the crochet tutorials section on the website. These guides explain crochet stitches, techniques, and pattern methods in a clear and beginner-friendly way.
You’ll find helpful stitch tutorials, visual diagrams, and step-by-step guides that make it easier to learn new stitches and improve your crochet skills while completing your project.
Feel free to explore the additional sections of our website for even more crochet patterns, helpful tutorials, and creative inspiration.
Each section is thoughtfully organized to make it easy to find exactly what you’re looking for and to support you at every stage of your crochet journey.
Crochet Pattern FAQ

Is this round crochet pillow suitable for beginners?
Yes, this round crochet pillow is perfect for beginners. The pattern uses only the double crochet stitch and simple increases while working in the round, making it easy to follow even if you are new to crochet.
What crochet stitches are used in this cushion pattern?
This pattern uses only the double crochet stitch. No advanced stitches, post stitches, or complex techniques are required, making it ideal for beginners.
What size crochet hook should I use for a round pillow?
A 3 mm crochet hook is used for this round scatter cushion. Using the recommended hook size helps maintain neat stitches and a firm, modern finish.
How big is the finished round crochet cushion?
The finished cushion measures approximately 50 cm (20 inches) in diameter, making it a great size for sofas, beds, or accent chairs.
Do I need to know how to crochet in the round?
Basic knowledge of crocheting in the round is helpful, but this tutorial includes beginner-friendly tips for working in the round, including stitch counting and tension control.
Can I start this pillow without a magic ring?
Yes, if you are not comfortable using a magic ring, you can start with chain 4 and join with a slip stitch to form a ring. Both methods work well for this pattern.
How do I change colors when crocheting in the round?
To change colors, complete the final yarn-over of the last double crochet with the new color. This creates a clean color transition that is easy for beginners to manage.
How much yarn do I need to make this cushion?
Each side of the cushion uses approximately half of the total yarn. The listed 50 g skeins are enough to complete both the front and back panels of one full cushion.
What type of yarn is best for a crochet pillow?
100% cotton yarn is ideal for crochet pillows because it is durable, breathable, and holds its shape well. It also creates crisp stitches for a clean, modern look.
How do I join the front and back of a crochet pillow?
Place the two panels wrong sides together and join them using slip stitches or single crochet around the edge. Leave a small opening for stuffing before closing completely.
What can I use to stuff a crochet cushion?
You can use polyester fiberfill or a ready-made cushion insert. Stuff evenly and avoid overfilling to keep the pillow soft and comfortable.
Can I use different colors for this round crochet cushion?
Yes, this cushion works well with many color combinations, including monochrome shades, coastal blues, neutrals, or bold contrast colors.
Is this crochet pillow pattern good for home décor projects?
Absolutely. The simple stitch pattern and round shape make this cushion a stylish, modern home décor piece that suits both minimalist and cozy interiors.

