
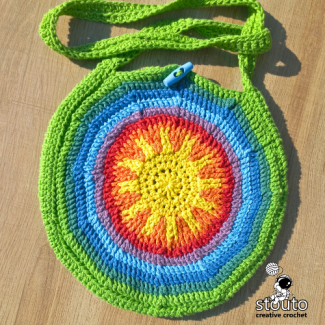
Looking for a colourful crochet bag that's both practical and beautiful? This Sunshine Rainbow Round Crochet Bag Pattern combines a cheerful Sun motif with a textured woven construction to create a sturdy tote that's perfect for everyday use.
Whether you're heading to the farmers market, spending a day at the beach, carrying your latest crochet project, or simply looking for a fun handmade accessory, this round crochet bag is designed to be both durable and stylish.
35% Raverly Sale
About This Pattern
Whether you're heading to the farmers market, spending a day at the beach, carrying your latest crochet project, or simply looking for a fun handmade accessory, this round crochet bag is designed to be both durable and stylish.
Unlike many lightweight crochet bags, this design uses textured crochet stitches worked in the round to create a dense fabric that holds its shape well. When paired with cotton, bamboo, or nylon yarn, the finished bag is strong enough for everyday use while still remaining comfortable to carry.
The pattern also includes multiple strap length options, allowing you to customise your bag as a short-handled tote, shoulder bag, or crossbody bag.
If you've been searching for a free crochet bag pattern, round crochet tote bag, crochet market bag, or crochet beach bag pattern, this design is a fantastic project to add to your collection.
Why You'll Love This Crochet Bag Pattern
This Sunshine Rainbow Tote has been designed to be both beautiful and practical.
Pattern Features
- Beginner-friendly step-by-step instructions
- Written in standard US crochet terms
- Textured woven construction for extra durability
- Colourful Sunshine and Rainbow design
- Multiple strap length options included
- Easily customised colour combinations
- Adjustable bag size
- Perfect for cotton, bamboo, or nylon yarns
- Suitable for everyday use
- Great stash-busting project
A Durable Crochet Tote Bag Designed to Last
Many crochet bags stretch over time or become floppy after regular use. This pattern has been specifically designed to reduce stretching by combining textured stitches with durable fibre choices.
The raised Front Post Double Crochet stitches create beautiful texture while adding structure to the bag.
Working portions of the pattern through the back loops also creates a woven appearance that helps the fabric remain firm without becoming stiff.
For best results, use one of these yarn fibres:
- Cotton
- Bamboo
- Cotton/Bamboo blends
- Cotton/Nylon blends
- Nylon
These fibres provide excellent stitch definition, minimal stretching, and long-lasting durability.
Upgrade to the AD FREE PDF Pattern Version


The PDF Includes
- Printer-friendly, ad-free format
- Detailed step-by-step instructions
- Stitch counts for every round
- Colour guide and construction overview
- Strap length options
- Bag resizing instructions
- Beginner-friendly assembly and finishing guide
Download the Sunshine Rainbow Round Crochet Bag Pattern PDF today and start crocheting your own colourful tote bag!
⚠️ This pdf pattern is for personal use only. Please do not copy or redistribute.Please share and link to website pattern page, if you wish to share free pattern.
Materials & Tools
| Hook | 4mm Crochet Hooks |
|---|---|
| Yarn Weight | Worsted Yarn |
| Fibre Type | Double Crochet (DK) Cotton Yarn |
| Other Tools |
Yarn
DK (Light Worsted #3)
Recommended fibre content:
- Cotton
- Bamboo
- Cotton Blend
- Cotton/Nylon Blend
- Nylon
Approximate yarn required: 360 metres (400 yards)
Yarn requirements may vary slightly depending on the strap length and any resizing adjustments.
Crochet Hook
- 4.0 mm (G/6)
- or 4.5 mm (7)
Choose the hook that gives you a firm fabric without making the stitches difficult to work.
Colour Guide
The sample bag uses the following colours:
- Yellow - Sunshine Centre
- Orange - Inner Sun Rays
- Red - Rainbow Stripe
- Purple - Rainbow Stripe
- Light Blue - Rainbow Stripe
- Blue - Rainbow Stripe
- Dark Green - Rainbow Stripe
- Light Green - Rainbow Stripe
- Main Colour - Background Panel
Don't be afraid to experiment with your favourite colours.
Some fun ideas include:
- Sunset colours
- Ocean blues
- Earthy neutrals
- Pastels
- Christmas colours
- Autumn shades
- Monochrome
Yarn Calculator
Not sure how much yarn you'll need for your next crochet project?
Use our yarn calculator to estimate the amount of yarn required based on your project size, yarn weight, and stitch pattern.
It's a quick and easy way to plan your materials before you start crocheting.
Pattern Instructions
Pattern Notes
Crochet Skills Required for Pattern
As you make this project, you'll practise several useful crochet techniques, including:
- Working in the round
- Magic Ring
- Half Double Crochet
- Double Crochet
- Front Post Double Crochet (FPdc)
- Back Loop Only stitches (BLO)
- Colour changes
- Joining rounds
- Constructing crochet bags
Even if you've never made a crochet bag before, this project is a great introduction to structured bag construction.
Project Size Information
Finished Measurements
Using the recommended yarn and hook size:
Bag Body (Laid Flat)
- Width: 26 cm (10¼")
- Height: 26 cm (10¼")
Including Straps
- Height: 105 cm (41¼")
Finished size will vary slightly depending on your yarn, hook size, and crochet tension.
Construction Overview
This crochet tote bag is made in three separate pieces before being assembled.
You'll crochet:
- One Front Panel
- One Back Panel
- One Long Strap
The strap forms both the bag base and the handles, giving the finished tote excellent strength.
The Front Panel features the colourful Sunshine motif.
The Back Panel is worked as a solid circle using your chosen background colour.
If you would prefer the Sunshine motif on both sides of your bag, simply crochet two Front Panels instead of making a solid back panel.
Both panels are worked in joined rounds with the right side facing you throughout the project.
Creating the Sunshine Design
The Sunshine motif begins with a simple circular centre before gradually introducing textured stitches that form raised sun rays.
The first four rounds are worked in a single colour.
From Round 5 onwards, new colours are introduced to build the sunshine effect.
The outer rounds create the beautiful rainbow border that makes this bag such a cheerful project.
You can follow the rainbow colours shown in the sample or customise the palette to suit your own style.
Pattern Variations
One of the best things about this pattern is how easy it is to customise.
Rainbow Tote
Follow the pattern exactly as written to recreate the colourful sample.
Striped Tote
Change colour every round after Round 9 to create bold stripes.
Solid Colour Tote
Use one colour throughout for a timeless everyday handbag.
Double Sunshine Tote
Crochet two Sunshine panels instead of making one plain back panel.
This creates a colourful design on both sides of the bag.
Resizing Guide
Resize Your Crochet Bag
Need a larger beach bag?
Want a smaller handbag?
This pattern can easily be adjusted.
To Make a Larger Bag
Continue working additional increase rounds after the final pattern round.
Each new round increases by 12 stitches while maintaining the established stitch pattern.
Remember to make both panels the same size.
You'll also need to adjust the strap length to fit the larger circumference.
To Make a Smaller Bag
Simply stop after the round that gives you your preferred size.
For example:
- Round 8 creates a smaller handbag.
- Round 10 creates a medium tote.
Again, both panels should be crocheted to the same size before assembly.
Perfect For
This crochet bag makes a wonderful:
- Market bag
- Beach bag
- Everyday handbag
- Crochet project bag
- Library bag
- Shopping tote
- Gift bag
- Handmade birthday gift
- Mother's Day gift
- Summer accessory
Its sturdy construction makes it practical enough for daily use while still showcasing beautiful crochet texture.
Quick Stitch Guide
All stitch instructions are available in both US Crochet Terminology and UK Crochet Terminology, making it easy to follow along using the terms you are most familiar with.
If you are new to any of the stitches used in this pattern, we recommend reviewing the relevant stitch guide before starting. Each guide includes step-by-step instructions, helpful tips, and stitch terminology conversions where applicable.
Take your time, practice any unfamiliar stitches, and most importantly—enjoy the process of creating your blanket one row at a time.
UK : 2tr - 2 treble crochet
AFR : 2lb - 2 Langbeentjies in selfde steek
1. Work 1 dc into the stitch (complete as usual).
2. Work a second dc into the same stitch.
3. Both sts occupy the same base — small cluster.
UK : tr - treble crochet
AFR : lb - Langbeentjie / dubblehekel
1. Yarn over.
2. Insert hook into stitch, pull up a loop (3 loops).
3. Yarn over and pull through first 2 loops (2 remain).
4. Yarn over and pull through last 2 loops.
UK : fptr - front post treble crochet
AFR : vblb / vslb - Voorste Been Langbeentjie / Voor Stam Langbeentjie / voorpaal-dubblehekel
1. Yarn over, insert hook front→back→front around post.
2. Yarn over, pull up loop (3 loops).
3. Yarn over, pull through first 2 loops, yarn over, pull through last 2 loops.
UK : htr - half treble crochet
AFR : hlb - Halwe Langbeentjie / Half Lang Been / half-dubblehekel
1. Yarn over.
2. Insert hook into next stitch and pull up a loop (3 loops).
3. Yarn over and pull through all 3 loops.
UK : MC - magic circle
AFR : MR - Magiese Ring
1. Wrap yarn around your fingers to form a loop.
2. Insert hook into the loop and pull yarn through to create your first stitch.
3. Crochet the number of stitches required by your pattern into the loop.
4. Pull the yarn tail to close the loop tightly.
5. Continue with the next round as instructed.
UK : rep from * - repeat from *
AFR : her * - Herhaal van *
1) Find the *.
2) Work the instructions after it.
3) When told, go back to * and repeat the sequence the required number of times.
4) Stop when the pattern says.
UK : rep rows - repeat rows
AFR : Her/herh - Herhaal
Work rows as written for repetition count.
UK : sts - stitches
AFR : sts - Steke
1) Identify the stitch’s top “V”.
2) Insert hook as pattern instructs (both loops or FLO/BLO).
3) Work the stitch to completion. 4) Count stitches regularly.

Pattern Reference
This page is part of a larger crochet pattern and is intended as a companion tutorial or stitch reference. For complete instructions, materials, sizing information, and all pattern sections, please visit the main pattern page.Step by Step
⚠️ This pattern is for personal use only. Please do not copy or redistribute.
Free Sunshine Rainbow Round Crochet Bag Pattern
Front Panel of Bag
Crochet Sunshine Motif Tutorial
The Sunshine motif is worked from the centre outward in joined rounds. Each round builds on the previous one to create a textured Sun surrounded by colourful rainbow stripes.
The centre of the Sun is worked in yellow before textured Front Post Double Crochet (FPdc) stitches create the raised rays. The rainbow border is then added using simple colour changes.
Helpful Tip:Place a stitch marker in the first stitch of every round. This makes it much easier to identify where each round begins and helps keep your stitch count accurate.

Round 1
Colour:Yellow
- Make a Magic Ring.
- Chain 2.
- Work 12 double crochet (dc) into the Magic Ring.
- Pull the ring closed.
- Join with a slip stitch.
Stitch Count:12 dc
Round 2
Continue with Yellow.
- Chain 2.
- Work 2 half double crochet (hdc) into every stitch around.
- Join with a slip stitch.
Stitch Count: 24 hdc
Your circle should now lie flat with two stitches worked into every stitch from Round 1.
Round 3
Continue with Yellow.
- Chain 2.
- Work 1 hdc in the first stitch.
- Work 2 hdc in the next stitch.
- Repeat around.
- Join.
Stitch Count:36 hdc
Round 4
Continue with Yellow.
This round creates chain spaces that will later become part of the Sunshine rays.
- Chain 2.
- Work 1 dc in each of the next two stitches.
- Chain 1.
- Skip one stitch.
- Repeat around.
- Join.
Stitch Count : 24 dc + 12 chain spaces
Total: 36 stitches

Round 5
Change to Orange.
Join the new colour into one of the skipped stitches from Round 4.
For each repeat:
- Work 2 dc into the skipped stitch.
- Work 1 BLO single crochet into each of the next two dc.
Repeat around.
Join with a slip stitch.
Stitch Count: 48 stitches
Round 6
Change back to Yellow.
This round introduces the raised Sunshine texture.
For each repeat:
- FPdc around the first dc post from Round 4.
- FPdc around the second dc post from Round 4.
- BLO single crochet into each of the next two stitches.
Repeat around.
Join.
Stitch Count: 48 stitches
You'll begin to see the raised Sunshine rays appearing.
Round 7
Change to Orange.
For each repeat:
- FPdc around first post.
- Chain 1.
- FPdc around second post.
- BLO single crochet in each of the next two stitches.
Repeat around.
Join.
Stitch Count: 60 stitches

Round 8
Change back to Yellow.
For each repeat:
- FPdc
- FPdc
- BLO single crochet
- BLO single crochet into chain space
- BLO single crochet
Repeat around.
Join.
Fasten off Yellow and weave in the yarn end.
Stitch Count:60 stitches
At this stage your Sunshine centre is complete.
Round 9
Join Orange.
For each repeat:
- FPdc
- dc into chain space
- FPdc
- BLO single crochet in next two stitches
Repeat around.
Join.
Stitch Count: 60 stitches
Round 10
Continue with Orange.
For each repeat:
- FPdc
- FPdc
- FPdc
- FPdc
- dc between FPdc stitches
- FPdc
Repeat around.
Join.
Stitch Count: 72 stitches
This round forms the base that supports the colourful rainbow border.

Round 11
Change to Red.
For each repeat:
- 2 FPdc around the first stitch.
- FPdc in the next five stitches.
Repeat around.
Join.
Stitch Count: 84 stitches
Round 12
Change to Purple.
For each repeat:
- 2 FPdc in first stitch.
- FPdc in next six stitches.
Repeat around.
Join.
Stitch Count: 96 stitches
Round 13
Change to Light Blue.
For each repeat:
- 2 FPdc in first stitch.
- FPdc in next seven stitches.
Repeat around.
Join.
Stitch Count: 108 stitches
Round 14
Change to Blue.
For each repeat:
- 2 FPdc in first stitch.
- FPdc in next eight stitches.
Repeat around.
Join.
Stitch Count:120 stitches
Round 15
Change to Dark Green.
For each repeat:
- 2 FPdc in first stitch.
- FPdc in next nine stitches.
Repeat around.
Join.
Stitch Count:132 stitches
Round 16
Change to Light Green.
For each repeat:
- 2 FPdc in first stitch.
- FPdc in next ten stitches.
Repeat around.
Join with a slip stitch.
Fasten off.
Weave in all yarn ends.
Final Stitch Count:144 stitches
Your First Panel Is Finished
Congratulations!
You've completed one side of your Sunshine Rainbow Tote Bag.
For the second side you have two options:
- Crochet a solid back panel using your chosen background colour.
- Crochet a second Sunshine panel for a colourful design on both sides of the bag.
Once both panels are complete, it's time to crochet the strap, which forms the bag base and handles before assembling the tote.
Beginner Tips
Before moving on, take a few minutes to:
- Count your final stitches.
- Check that your circle lies flat.
- Weave in loose yarn ends as you go.
- Lightly block the panel if necessary.
A well-shaped panel will make assembling the bag much easier and produce a more professional finish.

Back Panel
The Back Panel is worked in the same way as the Front Panel, but without the Sunshine motif. Instead, it is crocheted as a solid textured circle using your chosen background colour.
The finished Back Panel should have the same stitch count and diameter as the Front Panel before assembling the bag.
Tip: If you would like the Sunshine motif on both sides of the bag, simply crochet a second Front Panel instead of following these instructions.
Round 1Make a magic ring.
- Chain 2 (does not count as a stitch).
- Work 12 double crochet (dc) into the magic ring.
- Pull the magic ring closed.
- Join with a slip stitch.
Stitch Count: 12 dc
Round 2
- Chain 2.
- Work 2 half double crochet (hdc) into each stitch around
- Join with a slip stitch.
Stitch Count: 24 hdc
Round 3
- Chain 2.
- Work 1 hdc in the first stitch.
- Work 2 hdc in the next stitch.
- Repeat around.
- Join with a slip stitch.
Stitch Count: 36 hdc
Round 4
This round introduces the textured Front Post Double Crochet stitches.
- Chain 2.
- Work 2 Front Post Double Crochet (FPdc) around the first stitch.
- Work 1 FPdc around the next stitch.
- Repeat around.
- Join with a slip stitch.
Stitch Count: 48 FPdc

Rounds 5–16
Continue increasing the circle by 12 stitches in every round.
For each new round:
- Work 2 FPdc into the first stitch of each repeat (increase).
- Work 1 FPdc into each remaining stitch of the repeat.
- Repeat 12 times around.
- Join with a slip stitch at the end of each round.
Increase by one additional FPdc between the increases on every new round.
The stitch counts should be:
- Round 5 - 60 stitches
- Round 6 - 72 stitches
- Round 7 - 84 stitches
- Round 8 - 96 stitches
- Round 9 - 108 stitches
- Round 10 - 120 stitches
- Round 11 - 132 stitches
- Round 12 - 144 stitches
Fasten off and weave in the yarn ends.
Your Back Panel is now complete and ready to be joined to the strap during assembly.

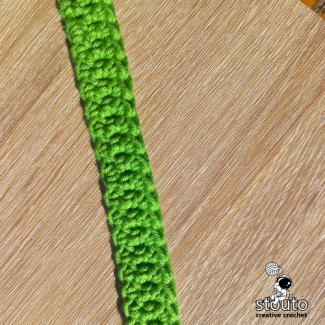
Crochet Bag Strap Tutorial
The strap is worked as one continuous piece and forms both the base of the bag and the handles. By adjusting the starting chain, you can easily customise the finished bag to suit your lifestyle.
Whether you prefer a compact handbag, a shoulder tote, or a crossbody bag, simply choose the handle length that works best for you.
Strap Length Guide
Begin by chaining 96 stitches for the bag base.
Then add additional chains for your chosen handle length.
Formula : 96 base chains + handle chains = Starting Chain
Example
For a shoulder bag:
- 96 + 120 = 216 chains
Simply chain 216 to begin.
Recommended Strap Lengths
- Short Handle : 30–60 cm (12–24") - Additional Chains : 45–100
- Short Shoulder : 50–60 cm (19–24") - Additional Chains : 90–100
- Shoulder : 70–90 cm (28–35") - Additional Chains : 120–145
- Long Shoulder : 95–110 cm (37–43") - Additional Chains :125–165
- Crossbody : 100–140 cm (39–55") - Additional Chains : 150–175
Remember that your tension and yarn choice may slightly affect the finished measurements.
Crocheting the Strap
Once you've completed the required starting chain, count 96 chains from the beginning and place a stitch marker.
This marker indicates where the bag base ends and the handle begins.
Row 1
- Chain 1.
- Work 1 hdc into the second chain from the hook.
- Continue working 1 hdc into every chain.
- Chain 1 and turn.
Row 2
- Chain 1.
- Work 1 hdc through the front two loops of every stitch.
- Chain 1 and turn.
Row 3
Repeat Row 2.
Row 4
Repeat Row 2.
Fasten off.
Joining the Strap
Bring both ends together to form one continuous loop.
Join them using either:
- Single crochet
- Slip stitches
- Mattress stitch with a yarn needle
This join becomes the bottom centre of the bag.

Attaching the Front Panel
- Place a stitch marker at the bottom centre of the Sunshine panel.
- Locate the centre of the strap using the stitch marker placed after the first 96 chains.
- Count half the base stitches on both the panel and the strap to position them accurately before joining.
- Place the panel and strap together with the right sides facing each other.
- Join them using one single crochet through both layers in every stitch.
- Repeat for the opposite side.

Attaching the Back Panel
- Attach the second panel exactly the same way.
- Before beginning, double-check that the strap has not twisted.
- Once joined, turn the bag right side out.
- The basic construction is now complete.
Finishing the Bag
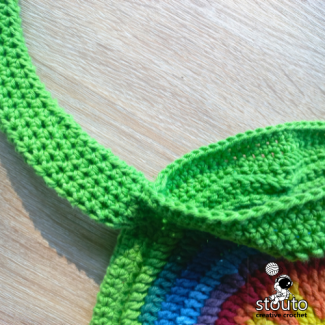
The finishing rounds strengthen the top edge while giving the bag a polished appearance.
Round 1
- Join yarn where the panel meets the strap.
- Work one half double crochet evenly around the entire opening.
- Join with a slip stitch.
Round 2
Work one half double crochet in every stitch.
Join.
Round 3
Repeat Round 2.
Fasten off.
Repeat these rounds on the opposite side.

Optional Reinforced Handles
If you'd like firmer handles for carrying heavier items:
- Fold each handle lengthwise.
- Sew the inside edges together using matching yarn.
This creates a thicker handle with extra strength.
If you prefer softer handles, simply weave in the yarn ends and leave the handles unstitched.
Care Instructions
To help your handmade tote last for years:
- Hand wash when possible.
- Reshape while damp.
- Lay flat to dry.
- Avoid hanging the bag while wet.
- Store folded when not in use.
Cotton and bamboo yarns may soften slightly after washing while maintaining excellent durability.

Download the Printable PDF Pattern
Love this free crochet tutorial but prefer to crochet offline?
Download the printable Sunshine Rainbow Round Crochet Bag Pattern PDF and enjoy an ad-free version with step-by-step instructions, stitch counts, colour guide, construction diagrams, strap sizing options, and helpful assembly notes.
The PDF is perfect for printing or viewing on your tablet while you crochet, making it easy to follow each round without scrolling.
What Other Crocheters Say
This pattern hasn’t been reviewed yet.
Be the first to share your experience and help other crocheters.
Made it work? Share your result
Post a ReviewPattern Copyright & Usage
This crochet pattern and all associated content are the original work of Stouto Crochet.
- ✔️ Personal use allowed
- ✔️ Sell finished handmade items (small-scale)
- ❌ Do not copy, rewrite, or redistribute
- ❌ Do not share or resell PDF patterns
AI & Content Use: This pattern may not be reproduced or used to train AI systems.
Explore More Crochet Tutorials on the Website
If you need extra help while working on your stitch sampler blanket, you can explore the crochet tutorials section on the website. These guides explain crochet stitches, techniques, and pattern methods in a clear and beginner-friendly way.
You’ll find helpful stitch tutorials, visual diagrams, and step-by-step guides that make it easier to learn new stitches and improve your crochet skills while completing your project.
Feel free to explore the additional sections of our website for even more crochet patterns, helpful tutorials, and creative inspiration.
Each section is thoughtfully organized to make it easy to find exactly what you’re looking for and to support you at every stage of your crochet journey.
Crochet Pattern FAQ
Is this crochet bag suitable for beginners?
Yes.
If you're comfortable working basic stitches in the round and following colour changes, you'll find this an enjoyable project. The step-by-step tutorial explains each round clearly.
What yarn works best?
Cotton is the most popular choice because it produces a strong, durable fabric with very little stretch.
Bamboo and nylon blends also work beautifully.
Can I make the bag larger?
Absolutely.
Simply continue the increase pattern for additional rounds before assembling the bag.
Remember to adjust the strap length to fit the larger panels.
Can I use one colour?
Yes.
The Sunshine design looks wonderful worked in a single colour if you prefer a more minimalist style.
Can I make this a crossbody bag?
Yes.
The pattern includes chain counts for crossbody-length straps, making it easy to customise the finished bag.

