
Step-by-Step Guide to Crocheting a Mini Basket
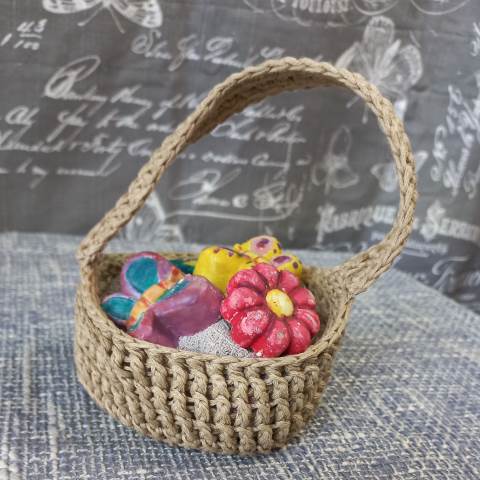
If you're looking for a cute, easy project to make as a wedding favor or party favor, this mini basket crochet pattern is the perfect solution. It's so simple and adorable that even beginners will be able to follow the step-by-step instructions.
35% Raverly Sale
About This Pattern
Why I Love This Pattern
There are so many reasons I keep coming back to this mini basket pattern:
- Quick finish: You can make one in under an hour – instant satisfaction for beginners and seasoned crocheters alike.
- Beginner-friendly: It uses only simple stitches, so you’ll build skills without getting overwhelmed.
- Practical & pretty: The baskets are useful for organizing little things while also looking adorable.
- Customizable: Change up the yarn, size, or colors, and every basket feels completely unique.
- Perfect for gifts: Whether filled with candy, soaps, or jewelry, they make thoughtful handmade presents.
This pattern is one of those small projects that reminds you why crochet is so much fun – simple, creative, and rewarding
The best part? You only need a little yarn, a hook, and about an hour to create your very own mini crochet basket. Let’s get started!
Materials You’ll Need
- Yarn: Cotton DK or worsted weight yarn (cotton holds shape best)
- Hook: 3.5mm – 4mm (US G-6 / UK 8)
- Scissors
- Yarn needle (for sewing in ends)
- Optional: Stitch marker for round.
- Example yarn used: Elle Cottons DK, 100% cotton, 50g (approx. 83m)
Best Yarn for Making Mini Crochet Baskets
The yarn you choose makes a big difference in how your mini basket looks and holds up.
- Cotton yarn – The best choice for mini baskets. It’s sturdy, doesn’t stretch, and holds its shape beautifully. Great for baskets you’ll actually use for storage.
- T-shirt yarn / recycled yarn – Perfect for chunky, sturdy baskets. Great for beginners because it works up quickly.
- Bulky wool or acrylic blends – Good for soft baskets, especially if you’re making them for decoration.
Avoid yarns that are too stretchy or slippery (like bamboo or silk blends) because they won’t give your basket the structure it needs.
How to Select Colors for Your Mini Basket
- Choosing the right color makes your basket stand out! Here are a few tips:
- Match your theme: If you’re making baskets for weddings or parties, go for colors that match the event theme (white, cream, pastel pink, or gold).
- Go bold for home décor: Bright colors like turquoise, mustard, or coral make fun accent pieces.
- Neutral tones for everyday use: Beige, grey, or natural cotton give your basket a classic look that fits any space.
- Two-tone baskets: Try using one color for the base and another for the sides or handle for a modern twist.

What Can You Use a Crochet Mini Basket For?
Mini crochet baskets are so versatile! Try them as:
- Wedding or baby shower favors
- Small storage for jewelry or cotton pads
- Desk organizers for clips and pins
- Gift baskets filled with candy
- Cute home décor accents
Buy an AD FREE Crochet PDF Pattern


Materials & Tools
| Hook | |
|---|---|
| Yarn Weight | |
| Fibre Type |
Materials used in the example
Yarn - Elle Cottons - DK
Affordable doesn't have to mean compromising on quality. With the Elle range of 100% cotton, you get quality at a great price. And a wonderful selection of over 50 colors to choose from.
- Composition: 100% Cotton
- Yarn Weight: DK
- Ball Weight: 50g Ball
- Length: approx 83m
- Hooks 4 mm / G-6 crochet hook

Finished Measurements
- Basket base diameter: 9.5 cm / 3.7 inches
- Basket depth: 5.5 cm / 2.2 inches
- Basket bottom to top handle: 16 cm / 6.2 inches
- Handle length: 19 cm / 7.4 inches
Basic Techniques used to create a mini crochet basket pattern:
- The basket begins with a magic ring and is worked in the round (like a spiral circle).
- At the end of each round, you usually make 1 chain stitch (ch 1) before starting the next round.
- If you are keeping the same yarn and color, just continue with the next round after chaining 1.
- If you want to change colors, finish your round by making a slip stitch (sl st) into the top of the starting chain. Then join your new yarn color and begin the next round.
- As you crochet, you can either weave in your yarn ends as you go (which saves time later) or wait until the very end of your project to sew them in. Both ways work—it’s just your personal choice.
What is a Front Post Double Crochet (FPdc)?
A front post double crochet (FPdc) is a variation of the double crochet stitch (dc). Instead of inserting your hook into the top loops of the stitch (like you normally do), you insert it around the post of the stitch from the front side of your work.
This creates a raised stitch that stands out from the fabric, giving texture and dimension. It’s often used in basket weave patterns, ribbing, cables, and textured crochet designs.
How to Work a Front Post Double Crochet (FPdc)
Follow these steps (US terms – I’ll add UK terms below):
- Yarn over (YO) your hook once, just like you would for a normal double crochet.
- Instead of inserting your hook into the top loops of the stitch, insert your hook from front to back, then back to front around the post of the stitch in the previous row. Think of it like "hugging the post" with your hook.
- Yarn over and pull the yarn back through to the front. You will now have 3 loops on your hook.
- Yarn over, pull through the first 2 loops. (2 loops left)
- Yarn over, pull through the remaining 2 loops.
Helpful Tips
- If you insert your hook the wrong way, the stitch may look twisted. Remember: front to back to front around the post.
- The stitch will look like it’s popping forward/outward on the fabric.
- Pairing FPdc with its opposite stitch (BPdc – Back Post Double Crochet) is what creates ribbed textures like basket weave. - See my Basket Weave Mini Basket Pattern for more
UK Crochet Terms
In UK terms, the FPdc is called a Front Post Treble Crochet (FPtr).
The working method is the same, but since UK terms are one step up, the names differ.
Example in a pattern:
"FPdc around next stitch" → This means instead of working into the top of the stitch, work a front post double crochet around the vertical part (post) of the stitch below.
Pattern Instructions
Written Instructions
Crochet Abbreviations
US Terms (with UK equivalents):
- ch = chain (UK: chain)
- sl st = slip stitch (UK: slip stitch)
- sc = single crochet (UK: double crochet)
- hdc = half double crochet (UK: half treble crochet)
- dc = double crochet (UK: treble crochet)
- fpdc = front post double crochet (UK: front post treble crochet)
- fphdc = front post half double crochet (UK: front post half treble crochet)

Free Crochet Mini Basket Pattern
We’ll make the basket in rounds, starting with the base, then build up the sides, and finish with the handle.
Basket Base
Round 1: Start with a magic ring. Ch 3 (counts as dc/tr), work 11 dc (UK tr) into the ring. Join with sl st to the top of ch 3. (12 sts)
Round 2: Ch 2 (counts as dc/tr). 1 fpdc (UK fptr) around next st, 1 dc (UK tr) in space between posts. Repeat around. Join with sl st. (24 sts)
Round 3: Ch 2, 1 fpdc (UK fptr) around next st, 1 dc (UK tr) in space between posts. Repeat around. Join with sl st. (48 sts)
Round 4: Ch 2, fpdc (UK fptr) around each st. Repeat around. Join with sl st. (48 sts)
Round 5 (start of walls): Ch 1. Fphdc (UK fphtr) around each st. Join with sl st. (48 sts)

Basket Walls
Round 6: Ch 2. Fpdc (UK fptr) around each st. Join. (48 sts)
Round 7: Ch 1. Fphdc (UK fphtr) around each st. Join. (48 sts)
Round 8: Repeat Round 6. (48 sts)
Round 9: Repeat Round 7. (48 sts)
Round 10 (finishing round): Ch 1, hdc (UK htr) in each st around. Join and fasten off.
Basket Handle

- Ch 30 (or desired length).
- Attach one end of chain to basket rim with sl st.
- Attach the other end on the opposite side with sl st.
- Optional: Work sc (UK dc) along the chain for a sturdier handle.
Joining the handle.
Use a yarn needle and yarn and join one of the short ends of the completed handle strip to the top of the basket, with some simple stitches, finish off, and work in ends, do the same for the other end of the strip, to the opposite side of the basket, finish off, and work in ends.
Finishing Touch
- Weave in all ends with a yarn needle.
- Optional: Add a decorative border in a contrasting color.
That’s it! Your mini crochet basket is ready to use.

Optional - Add border around basket top and handle
- Join yarn with a slip stitch into the second stitch from the handle on the basket rim, ch2, counts as first hdc, 1
- 1hdc into each stitch along the rim of the basket until the handle is reached,
- continue the hdc stitches into each stitch up along the handle, until the rim of the basket has been reached,
- 1hdc back into the basket rim stitches, continue along until the starting ch2,
- join with slip stitch in staring chain, finish off, and work in ends.
- Repeat this for the other side of the handle and basket rim.
FAQs About Crochet Mini Baskets
Can beginners make this pattern?
Yes! This pattern uses only basic stitches and simple repeats, so it’s perfect for new crocheters.
How long does it take to make?
About 30–60 minutes depending on your speed.
What yarn works best?
Cotton yarn works best for structure, but you can also try t-shirt yarn or bulky yarn for larger baskets.
Can I sell baskets I make from this pattern?
Yes! Handmade baskets are great sellers at craft fairs and online shops.
Quick Stitch Guide
All stitch instructions are available in both US Crochet Terminology and UK Crochet Terminology, making it easy to follow along using the terms you are most familiar with.
If you are new to any of the stitches used in this pattern, we recommend reviewing the relevant stitch guide before starting. Each guide includes step-by-step instructions, helpful tips, and stitch terminology conversions where applicable.
Take your time, practice any unfamiliar stitches, and most importantly—enjoy the process of creating your blanket one row at a time.
UK : ch - chain
AFR : ks - ketting steek
Make a slipknot, yo, pull through loop. Repeat for desired chains.
UK : dc - double crochet
AFR : kb - kortbeen / kortbeentjies / enkelhekel
1. Insert hook into the next stitch.
2. Yarn over and pull up a loop (2 loops on hook).
3. Yarn over and pull through both loops. → 1 sc complete.
UK : htr - half treble crochet
AFR : hlb - Halwe Langbeentjie / Half Lang Been / half-dubblehekel
1. Yarn over.
2. Insert hook into next stitch and pull up a loop (3 loops).
3. Yarn over and pull through all 3 loops.
UK : tr - treble crochet
AFR : lb - Langbeentjie / dubblehekel
1. Yarn over.
2. Insert hook into stitch, pull up a loop (3 loops).
3. Yarn over and pull through first 2 loops (2 remain).
4. Yarn over and pull through last 2 loops.
UK : fptr - front post treble crochet
AFR : vblb / vslb - Voorste Been Langbeentjie / Voor Stam Langbeentjie / voorpaal-dubblehekel
1. Yarn over, insert hook front→back→front around post.
2. Yarn over, pull up loop (3 loops).
3. Yarn over, pull through first 2 loops, yarn over, pull through last 2 loops.
UK : fphtr - Front post half treble crochet
AFR : vbhlb / vshlb - Voorste Halwe Langbeen(tjies) / Voor Stam Halwe Langbeen(tjies)/ voorpaal half-dubble hekel
1. Yarn over, insert hook front→back→front around post.
2. Yarn over, pull up loop (3 loops).
3. Yarn over, pull through all 3 loops.
UK : sts - stitches
AFR : sts - Steke
1) Identify the stitch’s top “V”.
2) Insert hook as pattern instructs (both loops or FLO/BLO).
3) Work the stitch to completion. 4) Count stitches regularly.
UK : -
AFR : -
Slip Knot in 4 Steps: Loop → Hook → Pull → Tighten

Pattern Reference
This page is part of a larger crochet pattern and is intended as a companion tutorial or stitch reference. For complete instructions, materials, sizing information, and all pattern sections, please visit the main pattern page.What Other Crocheters Say
This pattern hasn’t been reviewed yet.
Be the first to share your experience and help other crocheters.
Made it work? Share your result
Post a ReviewPattern Copyright & Usage
This crochet pattern and all associated content are the original work of Stouto Crochet.
- ✔️ Personal use allowed
- ✔️ Sell finished handmade items (small-scale)
- ❌ Do not copy, rewrite, or redistribute
- ❌ Do not share or resell PDF patterns
AI & Content Use: This pattern may not be reproduced or used to train AI systems.
Explore More Crochet Tutorials on the Website
If you need extra help while working on your stitch sampler blanket, you can explore the crochet tutorials section on the website. These guides explain crochet stitches, techniques, and pattern methods in a clear and beginner-friendly way.
You’ll find helpful stitch tutorials, visual diagrams, and step-by-step guides that make it easier to learn new stitches and improve your crochet skills while completing your project.
Feel free to explore the additional sections of our website for even more crochet patterns, helpful tutorials, and creative inspiration.
Each section is thoughtfully organized to make it easy to find exactly what you’re looking for and to support you at every stage of your crochet journey.

