
A Large Flower Squares Blanket with a Modern Framed Design
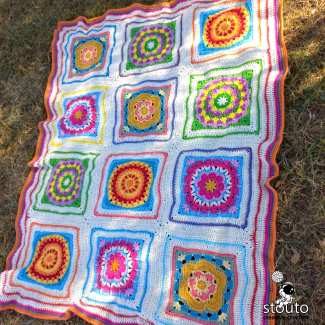
The Boxed Flower Squares Crochet Blanket is a modern design crochet blanket built around four beautiful large flower squares, each finished with clean, structured frames that give the blanket its signature boxed look. This large flower squares blanket is perfect for crocheters who love floral motifs but want a bold, contemporary finish rather than a traditional lacy granny square style.
35% Raverly Sale
About This Pattern
Designed as part of a fall crochet lapghan collection, this project combines visual impact with an enjoyable, confidence-building crochet process. By working with oversized floral squares, you’ll see fast, satisfying progress while creating a cohesive, polished blanket that feels both handmade and modern.
This large flower squares blanket is constructed using four oversized floral crochet squares, each worked individually and then enhanced with additional framed borders. These frames not only increase the square size but also create a strong, modern design crochet blanket aesthetic that sets this pattern apart from classic granny square projects.
The blanket features the following four unique flower square designs.
Each square has its own dedicated sub-page, where you’ll find the full written instructions for that individual design. These square patterns work alongside this main blanket pattern page, which guides you through square boxing, joining, layout, and final border construction.
The Four Floral Crochet Squares
This flower crochet squares blanket features four unique designs, each bringing its own character to the finished piece.

Boxed Flower Squares Crochet Blanket : Square One
A statement piece featuring a prominent floral motif framed by strong edges.
The Boxed Flower Squares Crochet Blanket: Square One introduces the first floral motif in this multi-square blanket design. Known as the Big Flower Square, this bold and textured granny square is worked in the round and later shaped into a square to form part of the complete blanket layout.

Boxed Flower Squares Crochet Blanket : Square Two
A classic floral center with clean stitch definition and a bold petal shape.
The Boxed Flower Squares Crochet Blanket: Square One introduces the first floral motif in this multi-square blanket design. Known as the Big Flower Square, this bold and textured granny square is worked in the round and later shaped into a square to form part of the complete blanket layout.

Boxed Flower Squares Crochet Blanket : Square Three (Free Pattern / Step by Step -Photo Tutorial)
Bright and cheerful, this square adds warmth and movement to the blanket.

Boxed Flower Squares Crochet Blanket : Square Four (Free Pattern / Step by Step -Photo Tutorial)
Playful and textured, perfect for adding contrast and visual interest.
Each square is worked in the round and finished into a neat, boxed shape, making this an ideal large granny square pattern for mix-and-match color play.
What Matters Most to Crocheters
This flower crochet squares blanket delivers:
- Enjoyable stitching
- Visible progress
- Practical everyday use
- A finished blanket you’re proud to keep or gift
Styling & Usage Ideas
- Summer lapghan
- Lightweight couch throw
- Picnic or travel blanket
- Handmade gift
Its floral design makes it especially popular for spring and summer décor.
How the Pattern Is Structured
The pattern is intentionally broken down into clear, manageable sections to make the project approachable and enjoyable:
- Each flower square is crocheted separately, allowing you to focus on one design at a time.
- Once the base flower square is complete, an additional boxed frame is added to enlarge the square and create a clean, structured edge.
- All squares are then joined into long strips, followed by a decorative joining method that connects the strips into the full blanket.
- The blanket is finished with an extended framed border that enhances the modern, boxed design.
- This modular structure makes the pattern ideal for confident beginners and experienced crocheters alike, while also allowing flexibility in color choices and square arrangement.
Why You’ll Love This Pattern
- Four distinct large flower squares for variety and visual interest
- Modern framed borders for a bold, structured finish
- Large crochet squares for faster progress and fewer joins
- Beginner-friendly construction with detailed instructions and guidance
- Solid, non-lacy fabric that’s practical for everyday use.
- Designed as a lightweight lapghan, perfect for couches, layering, or seasonal décor
The result is a modern design crochet blanket that feels fresh, stylish, and timeless, perfect for showcasing beautiful floral motifs without sacrificing structure or durability.
Get the Full Boxed Flower Squares Blanket Pattern (PDF)
The Boxed Flower Squares Crochet Blanket Pattern is available as a print-friendly PDF download from my shop, giving you everything you need to crochet the complete blanket with confidence and ease.
This premium PDF version is carefully written and thoughtfully structured to guide you from the very first square through to the final framed border—without guesswork or overwhelm.
What’s Included in the PDF Pattern
- When you purchase the PDF, you’ll receive:
- Step-by-step written instructions for the full blanket
- Detailed photo tutorials for each of the four large flower squares
- Yarn usage estimates for individual squares and borders
- Blocking and finishing instructions for professional results
- Clear joining guidance for assembling squares into strips and panels
- Instructions for the boxed square frames and final blanket border
Each large granny square pattern is designed to stand beautifully on its own, while still fitting together seamlessly to create a cohesive, modern design crochet blanket.

Why Choose the PDF Version?
- Crochet offline, anytime — no scrolling or ads
- Easy to print or save to your device
- Perfect for keeping all instructions in one organized place
Purchase the full Boxed Flower Squares Blanket Pattern PDF to unlock the complete design, advanced finishing details, and a smooth, enjoyable crochet experience from start to finish.


Materials & Tools
| Hook | 4.5mm Crochet Hooks |
|---|---|
| Yarn Weight | Worsted Yarn |
| Fibre Type | Cotton–Acrylic Blends |
| Other Tools | |
| Yarn Needed | Yarn Estimates for Example Blanket Size (Approximate)Yarn Requirements :
Yarn BreakdownFlower Squares (12 squares):
Note:Some flower squares use more of certain colors than others. Leftover yarn can be reused for the outer borders of the squares if desired, so do not be concerned if one color has more remaining yarn than another. Border Around Flower Squares:
Final Outer Border:
Crochet Hook : 4.5 mm crochet hook - (or size needed to obtain correct square measurements) |
| Finished Size | 120 x 157 cm / 47' x 62' |
Best Yarn for a Large Granny Square Pattern Lapghan
Choose Yarn You Love Working With
When making any blanket, especially a flower crochet squares blanket, your yarn choice matters. Crochet blankets are a true labor of love, so always start with a yarn you enjoy touching, stitching, and wrapping around yourself.
Recommended yarn qualities:
- Soft, breathable fibers
- Smooth stitch definition
- Easy care (machine washable preferred)
- Consistent thickness
Cotton blends, acrylics, and light wool blends all work well for this large granny square pattern.
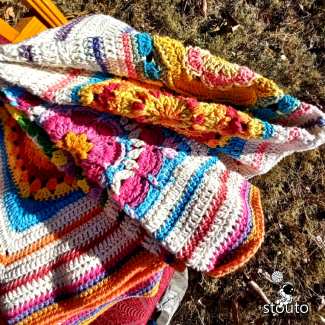
Colorful Textures made from 4 flower squares
How to select colors for your large granny squares blanket ?
Color Selection Tips for Flower Crochet Squares
Color choice can completely transform your blanket.
Bold & Bright
If you love vibrant projects, embrace bold color contrasts. Bright florals against neutral borders make each square pop and stand out.
Cohesive & Calm
For a more balanced look, choose 4–5 consistent colors and use them across all squares. Even though each floral granny square differs in design, repeated colors will unify the lapghan beautifully.
Both approaches work perfectly with this flower crochet squares blanket design.

Which crochet hook is best for my large granny square blanket ?
Crochet Hook Selection & Tension Tips
Choosing the correct hook size is essential when working a large granny square pattern.
- Use the hook size recommended for your yarn
- Maintain a relaxed, even tension
- Stick to the same hook throughout the project
If two squares of the same pattern turn out different sizes, the most common cause is switching hook sizes or changes in tension, not the pattern itself.

Yarn Substitution Guide
This pattern was designed using medium weight (Category 4) yarn, but it can be easily adapted using similar yarns. When substituting yarn, always aim to match the yarn weight and recommended hook size to maintain square size and stitch definition.
Suitable Yarn Types
You may substitute the original yarn with any of the following:
- Worsted Weight Yarn
- Aran Weight Yarn
- Medium Weight Acrylic, Cotton, Wool, or Blends
Fiber Considerations
- Acrylic Yarn: Lightweight, affordable, and easy to care for. Ideal for everyday lapghans.
- Cotton Yarn: Produces crisp stitch definition and a cooler finished fabric. May result in a slightly heavier blanket.
- Wool or Wool Blends: Adds warmth and softness but may affect final size due to stretch and blocking.
Gauge & Size Adjustments
- If your squares measure smaller than 24 cm / 9 inches, try: Using a larger hook size
- If your squares measure larger than 24 cm / 9 inches, try: Using a smaller hook size
Always complete one full flower square as a test swatch before committing to the entire project.
Color Substitution Tips
- Each flower square uses five colors, but exact color placement can be customized.
- High-contrast colors will highlight the floral design, while tonal shades create a softer, blended look.
- Leftover yarn from the flower squares can be reused for square borders or the final outer border for a cohesive finish.
Yarn Calculator
Not sure how much yarn you'll need for your next crochet project?
Use our yarn calculator to estimate the amount of yarn required based on your project size, yarn weight, and stitch pattern.
It's a quick and easy way to plan your materials before you start crocheting.
Pattern Instructions
Pattern Notes
This pattern is worked in the round, with the right side (RS) facing the front at all times.
Each flower granny square is completed individually before being bordered and joined.
Read through the full pattern instructions before starting to familiarize yourself with the construction and color changes.
- The pattern is written using standard US crochet terminology.
- Turning chains count as stitches unless otherwise stated in the pattern instructions.
- Always join rounds in the same way throughout the project to maintain consistency across all squares.
- For best results, complete one full square as a practice piece before continuing with the remaining squares.
Skills Required
To complete this pattern, you should be comfortable with the following:
- Understanding the basics of working in the round
- Changing and joining different yarn colors
- Ending off rounds neatly and finishing yarn tails securely
This pattern is suitable for confident beginners who have some experience with granny squares and color changes.
Techniques Used
- Working crochet stitches in continuous rounds
- Joining rounds using the same method throughout the pattern
- Changing yarn colors at the end of rounds
- Creating structured granny square borders
- Joining completed squares to form a lapghan
Gauge
- Gauge is important for this project.
- Stick to the same yarn weight and crochet hook size throughout all squares, or your squares may not match up when joining.
- If your squares are measuring larger or smaller than the stated size, adjust your hook size before continuing.
- Blocking individual squares before joining can help ensure uniform sizing.
Working in Ends
- Work in your ends as you go whenever possible.
- This will save significant time during finishing and prevent a large amount of loose ends at the end of the project.
- Unless you truly enjoy spending an entire day weaving in yarn tails, staying on top of ends will make the final assembly far more enjoyable.
Blocking & Finishing Notes
- Blocking your granny squares is highly recommended for achieving even sizing and crisp stitch definition.
- Block each square after completion and before joining to ensure all squares measure the same size.
- Use rust-proof pins and a blocking mat, foam board, or thick towel.
- Gently shape each square to 24 cm / 9 inches, paying special attention to corners.
- Allow squares to dry completely before removing pins.
Blocking Methods
Steam Blocking:
Suitable for acrylic and blended yarns. Hover steam above the square without touching the yarn.
Wet Blocking:
Best for natural fibers such as cotton or wool. Lightly dampen the square, shape, and pin into place.
Always check your yarn label before blocking and test on one square first.
Finishing Notes
- Ensure all yarn ends are securely woven in before joining squares.
- Join squares using your preferred method (slip stitch, whip stitch, or join-as-you-go), keeping joins consistent throughout the blanket.
- After joining the flower squares and adding the square borders, complete the final outer border as instructed.
- Lightly block the finished lapghan if needed to smooth edges and improve drape.
Project Size Information
- Individual Square Size: Approx. 24 cm / 9 inches
- Finished Lapghan Size: Approx. 120 x 157 cm / 47” x 62
Construction Overview

- Select your desired blanket size
- Determine how many large granny squares are required (see resizing guide)
- Gather materials listed in the pattern
- Create an equal number of squares based on your chosen size.
- Each square includes a thick multi-round border,take note follow instructions.
- Finish outer border of each square and block all squares before joining.
- Join squares according to the pattern instructions, then complete the final border.
Note:
Each square has its own individual pattern page. Squares can be used as standalone projects, mixed together, or repeated using one design while following the same finishing and joining method.

Why This Large Granny Squares Blanket Pattern Makes Life Easier
- This large granny squares blanket pattern was designed to remove common frustrations like inconsistent sizing, unclear joining, and overly complex stitches.
- Solid, easy-to-read stitches reduce eye strain and make long crochet sessions more enjoyable.
- Structured borders and clear stitch counts help every square finish at the same size, making joining stress-free.
- Step-by-step photo guidance builds confidence and keeps the entire process smooth from first square to final border.
Written Instructions
Step-by-Step Guide: Creating Your Boxed Flower Squares Blanket
This blanket is made by crocheting large floral granny squares, finishing each with a thick boxed border, and then joining the squares into a modern framed lapghan. The pattern is broken into sub-pages, with each flower square worked individually alongside the main blanket instructions.

Step 1: Select Your Desired Blanket Size
You have two options when starting this pattern:
Option A – Standard Pattern Size (Recommended)
Follow the standard blanket layout included in the pattern.
Blanket is made using a 3 × 4 square layout (12 large squares).
Ideal if you want a guided, no-math option.
Option B – Resize Your Blanket
Adjust the blanket to suit your space, bed, or couch.
Choose how many large squares you want across and down.
Use the resizing guide below to calculate your layout and yarn needs.
Step 2: Determine the Number of Squares Required (Resizing Guide)
Finished Square Measurements
Base square with boxed frame:33 cm × 33 cm (13" × 13")
Additional spacing allowance (joining & final borders): approx. 6 cm (2.5") per side.
Blanket Size Guide (Approximate)
| Blanket Size | Layout (Squares) | Finished Size (cm) | Squares Needed |
| Baby Blanket | 2 × 3 | 72 × 105 cm | 6 |
| Lapghan (Standard) | 3 × 4 | 120 × 157 cm | 12 |
| Small Throw | 4 × 4 | 138 × 138 cm | 16 |
| Medium Throw | 4 × 5 | 138 × 172 cm | 20 |
| Large Throw | 5 × 6 | 172 × 205 cm | 30 |
Measurements are approximate and will vary slightly depending on yarn choice, tension, and blocking.
Step 3: Gather Your Materials
Refer to the Materials Required section on the main pattern page and ensure you have:
- Medium weight yarn (same weight for all squares)
- 4.5 mm crochet hook (or size to match gauge)
- Stitch markers (optional)
- Yarn needle
- Scissors
- Blocking tools or mat
Step 4: Create Your Flower Squares
Crochet an equal number of each flower square design based on your chosen blanket size.
Each square is worked:
- In the round
- With multiple color changes
- Finished with a thick, multi-round boxed border
- Each flower square has its own dedicated sub-page with full written instructions and photo support.
Tip: Completing one full square (including the border) before starting the rest helps ensure consistent sizing.
Step 5: Finish Outer Borders & Block Squares
- Complete the outer framed border on every square.
- Weave in all ends securely.
- Block all squares to the same size before joining.
This ensures clean alignment and a professional finish.
Blocking is especially important for floral motifs and framed edges.

Step 6: Join Squares & Complete the Blanket
Join squares first into long vertical strips, following the joining notes on the main pattern page.
- Once strips are complete:
- Join the strips together using the decorative joining section.
Finish the blanket with:
- A framed extension round
- A final thick border to complete the modern boxed design

Final Notes
This large flower squares blanket is designed to be both visually striking and approachable. By breaking the pattern into individual square sub-pages and a structured main pattern, you can work at your own pace while still achieving a cohesive modern design crochet blanket.
Pattern Reference
This page is part of a larger crochet pattern and is intended as a companion tutorial or stitch reference. For complete instructions, materials, sizing information, and all pattern sections, please visit the main pattern page.Step by Step
⚠️ This pattern is for personal use only. Please do not copy or redistribute.

Creating Your Flower Squares
Step 1: Choose Your Square Layout
Select an equal number of each flower square design based on your chosen blanket size.
This ensures the finished blanket looks balanced and intentional.
Step 2: Complete Each Base Flower Square
- Follow the individual sub-page instructions for your chosen square.
- Work each square fully from Round 1 to the final round before starting another.
- Each square is written to finish with:
- The same stitch count
- The same number of sides
- A clearly defined corner structure
Individual Square Patterns :
- Boxed Flower Squares Crochet Blanket : Square One (Free Pattern / Step by Step -Photo Tutorial)
- Boxed Flower Squares Crochet Blanket : Square Two (Free Pattern / Step by Step -Photo Tutorial)
- Boxed Flower Squares Crochet Blanket : Square Three (Free Pattern / Step by Step -Photo Tutorial)
- Boxed Flower Squares Crochet Blanket : Square Four (Free Pattern / Step by Step -Photo Tutorial)
Important: Do not skip rounds or alter stitch counts. Consistency here is what allows the squares to join cleanly later.
Step 3: Check Size and Stitch Counts
Before moving on:
- Confirm that all completed squares are the same size
- Ensure final stitch counts match the pattern exactly
Why Stitch Counts Matter
- Keeps edges straight
- Ensures all squares remain square (not wavy or rounded)
- Makes joining faster, cleaner, and more secure
If one square is slightly off, fix it now rather than later.
Step 4: Finish All Base Squares with boxed frame before joining.
Follow the boxed frame instructions below
- Each square is framed using the same multi-round border
- Framing increases the square size and creates the signature modern boxed design
Always complete the framed border on every square before joining any squares together.

Color indication used in pattern example
Flower Square Border
1. Base Color - cream
2. Base Color - Cream
3. Color - Alternate color - random per square
4. Base Color - cream
5. Base color - cream

Step 4 : Individual Squares - Boxed Border
This is the next design step after completing the base pattern of each flower square
Once your base flower square is finished, you will add a boxed border around each square. This framed border increases the square size and creates the signature boxed look used throughout the blanket.
Complete this border for each finished flower square before joining.
Before You Begin
- All rounds are worked in the round, with the right side (RS) facing.
- Corner spaces are 2-chain spaces (2ch-sp).
- Corners are always worked the same way to keep the square shape.
- Stitch counts may vary slightly depending on the base square—focus on even sides and clear corners


Round 1 – Base Blanket Color (HDC Round)
Join yarn in any 2ch-sp corner.
Ch 2 (counts as first hdc), 1 hdc in same corner space
Ch 2, 2 hdc in same corner space
Sides:
1 hdc in each stitch across to the next corner
Corner:
(2 hdc, ch 2, 2 hdc) in the corner 2ch-sp
Repeat sides and corners around.
Join with sl st to the top of starting ch.
Do not fasten off.
Round 2 – DC Frame
Ch 3 (counts as first dc), 1 dc in corner space
Ch 2, 2 dc in same corner space
Sides:
1 dc in each stitch across
Corner:
(2 dc, ch 2, 2 dc) in the corner 2ch-sp
Repeat around.
Join with sl st to top of starting ch.
Fasten off.
Round 3 – Striped Border Color (HDC)
Join new color in any corner 2ch-sp.
Ch 2 (counts as first hdc), 1 hdc in same space
Ch 2, 2 hdc in same space
Sides:
1 hdc in each stitch across
Corner:
(2 hdc, ch 2, 2 hdc) in corner 2ch-sp
Repeat around.
Join with sl st to top of starting ch.
Fasten off.
Round 4 – Base Color (DC)
Join base color in any corner 2ch-sp.
Ch 3 (counts as first dc), 1 dc in same space
Ch 2, 2 dc in same space
Sides:
1 dc in each stitch across
Corner:
(2 dc, ch 2, 2 dc) in corner 2ch-sp
Repeat around.
Join with sl st to top of starting ch.
Do not fasten off.
Round 5 – Final HDC Frame
Ch 2 (counts as first hdc), 1 hdc in same corner space
Ch 2, 2 hdc in same corner space
Sides:
1 hdc in each stitch across
Corner:
(2 hdc, ch 2, 2 hdc) in corner 2ch-sp
Repeat around.
Join with sl st to top of starting ch.
Fasten off.
Finishing the Boxed Squares
Repeat Rounds 1–5 for each flower square.
- Work in all ends securely.
- Lightly block squares to ensure consistent size before joining.
- Once all squares are boxed, continue with:

Step 5 - Joining up your crochet granny squares into larger panel lengths
Joining your squares can be done in any technique that you feel comfortable in, you can join your squares with a single crochet stitch, or you can use a yarn needle and yarn and easily stitch two squares together using a relaxed blanket stitch. I opted for using the yarn needle, as I did not want a ridge to show between where one crochet square starts and where one crochet square ends.
Placing two squares on top of each other, right side facing inwards, join two squares together, once you have joined two squares, you will need to join the 3rd square on the adjacent side, to create one long row of 3 crochet squares.

Step 5 - How to Join Finished Granny Squares into Panels
Before You Begin
- Make sure all squares are fully completed and blocked for uniform size.
- Each square should include its boxed border rounds as per the sub-page instructions.
- Have your joining yarn ready (same color as your border or contrasting, depending on your design choice).
- You can join as you go or all at once using slip stitches, whip stitch, or a continuous join method.
Step 1: Lay Out Your Squares
- Select the number of squares for your first panel (e.g., 3–4 squares in a row).
- Lay them on a flat surface right side up, arranging them in the order you want the flower designs to appear.
- Check that all edges line up evenly, and the boxed borders match in width.
Step 2: Position for Joining
1. Choose your joining method:
- Slip Stitch Join: Creates a subtle ridge on the front.
- Whip Stitch Join: Uses a yarn needle to sew squares together; less visible ridge.
- Continuous Join As You Go: Works well if you’re crocheting the last round of the first square while attaching to the second.
2. Start with the first two squares. Place them wrong sides together if you want the join to show minimally.

Step 3: Begin Joining
1. If using slip stitch join:
- Insert hook through the corner stitch of both squares.
- Pull up a loop and slip stitch through both stitches.
- Continue along the side, stitch by stitch, keeping tension even.
2. If using whip stitch:
- Thread a yarn needle with joining yarn.
- Insert needle through the first stitch of both squares.
- Pull yarn through and repeat along the edge until you reach the next corner.

Step 4: Align and Secure Corners
- Corners are key: Make sure the 2ch or 3ch corners of each square match exactly.
- You can place a stitch marker in each corner to ensure alignment.
- Fasten off securely at corners for a stable join.
Step 5: Continue Adding Squares
- Once the first two squares are joined, repeat the process for the next square in your panel.
- Keep squares aligned side by side; check stitch counts if needed to maintain straight edges.
- Continue until you have completed the entire row or panel.
Step 6: Check Panel Alignment
- Lay your panel flat and check that the top and bottom edges are straight.
- If any gaps appear, you can adjust tension or add a few stitches along the join to smooth it out.
Step 7: Repeat for Additional Panels
- Make multiple panels in the same way if your blanket layout has more than one row of squares.
- Ensure each panel has the same number of squares and is aligned properly before joining panels together.
Tips for a Smooth Join
- Always join on a flat surface to avoid twisting.
- Use a stitch marker at corners to maintain square shape.
- Keep consistent tension to avoid wavy edges.
- Work slowly for the first few joins until you feel confident.

Join Panels of 3 Squares (Panel-to-Panel Joining)
Use this step once you have two or more long panels, each made from three joined granny squares.
Step 1: Prepare the Panels
- Lay two completed panels of 3 squares on a flat surface.
- Place them right sides together (RS facing inward) so the wrong sides are facing out.
- Carefully align the squares so that corners, stitches, and borders match along the full length of the panel.
Tip: Take a moment here—good alignment ensures straight seams and even tension.
Step 2: Secure Your Yarn
- Attach yarn at one corner of the panel using a slip knot.
- Insert your needle or hook through **both corresponding corner stitches** of the two panels.
Step 3: Join with a Relaxed Blanket Stitch
- Work a loose, even blanket stitch through both layers:
- Insert needle/hook through the next pair of matching stitches.
- Pull yarn through gently—do not tighten.
- Continue stitch by stitch along the full edge where the panels meet.
- Keep your tension relaxed to prevent puckering and to maintain the drape of the blanket.
Step 4: Continue Along the Full Panel Edge
- Join straight down the panel, matching:
- Border stitches
- Corner spaces between squares
- When moving from one square section to the next, maintain stitch alignment so the squares stay visually square.
Step 5: Extend the Join for Additional Panels
- Once two panels are joined, continue adding the next panel in the same way:
- Place the new panel right sides together with the completed section.
- Join along the edge following the same stitch path.
- Work steadily along the direction shown in the diagram (as indicated by the red lettering).
Step 6: Finish Off Securely
At the final corner:
- Fasten off yarn neatly.
- Weave in ends along the seam for strength and a clean finish.
- Open the panels and gently smooth the join flat.
Final Result
You now have a wider blanket section made from securely joined long panels, with soft, flexible seams that blend seamlessly into the design—ready for final border work or additional panel joins.
What Other Crocheters Say
This pattern hasn’t been reviewed yet.
Be the first to share your experience and help other crocheters.
Made it work? Share your result
Post a ReviewPattern Copyright & Usage
This crochet pattern and all associated content are the original work of Stouto Crochet.
- ✔️ Personal use allowed
- ✔️ Sell finished handmade items (small-scale)
- ❌ Do not copy, rewrite, or redistribute
- ❌ Do not share or resell PDF patterns
AI & Content Use: This pattern may not be reproduced or used to train AI systems.
Explore More Crochet Tutorials on the Website
If you need extra help while working on your stitch sampler blanket, you can explore the crochet tutorials section on the website. These guides explain crochet stitches, techniques, and pattern methods in a clear and beginner-friendly way.
You’ll find helpful stitch tutorials, visual diagrams, and step-by-step guides that make it easier to learn new stitches and improve your crochet skills while completing your project.
Feel free to explore the additional sections of our website for even more crochet patterns, helpful tutorials, and creative inspiration.
Each section is thoughtfully organized to make it easy to find exactly what you’re looking for and to support you at every stage of your crochet journey.

