
Welcome to the free Granny Square Blanket Pattern , Modern Heirloom Flowers . This page is the main pattern hub for a beautiful, textured granny square blanket made from four unique floral granny squares, each available as its own free sub‑pattern page.
This design combines modern texture with classic heirloom styling, making it perfect for blankets you’ll treasure, gift, or display. The instructions on this page guide you through how to make the blanket, while each individual granny square pattern is linked separately for easy reuse and resizing.
This page is written as the starting point of the free pattern, with clear steps, material guidance, sizing help, and links to each square.
35% Raverly Sale
About This Pattern
Why Choose This Granny Square Blanket Pattern?
Granny square blanket patterns remain one of the most loved crochet projects because they are relaxing to make, easy to customize, and perfect for using your favorite yarn colors.
The Heirloom Flowers Granny Square Blanket Pattern stands out because it offers:
- Four exclusive flower granny square designs
- Modern textured stitches with a classic heirloom feel
- Step-by-step photo support for confident crocheting
- Flexible sizing so you can create throws, baby blankets, or full-size afghans
This is more than just a crochet blanket, it’s a handmade heirloom you’ll treasure for years or gift with pride.
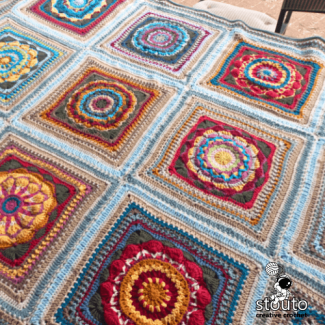
What Makes This Granny Square Blanket Pattern Unique
This granny square blanket pattern is built around four original floral granny squares, each worked in the round using a combination of textured crochet stitches. Expect beautiful dimension created with front post stitches, puff stitches, shell stitches, V-stitches, and treble crochet.
Each square is designed to work beautifully on its own while also fitting seamlessly into a cohesive blanket layout.
The 4 Granny Squares Used in This Blanket
Each square is worked in the round and has its own dedicated free pattern page, including stitch abbreviations, written instructions, and photo tutorials.
Follow the links below when creating each square:
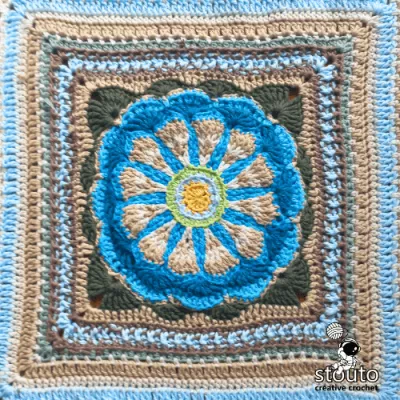
Daisy-Style Textured Square
Featuring half-double crochet stitches flowing into front post stitches, this square forms a sturdy, daisy-like texture with bold floral appeal.

Spiked-Tip Modern Flower Square
This design combines front post double crochets, shell stitches, and V-stitches to create a spiked, modern flower shape with plenty of texture and dimension.

Layered Petal Bloom Square
A modern floral design with front post double crochets and puff stitches layered for depth and dimension, perfect for a soft, textured finish.
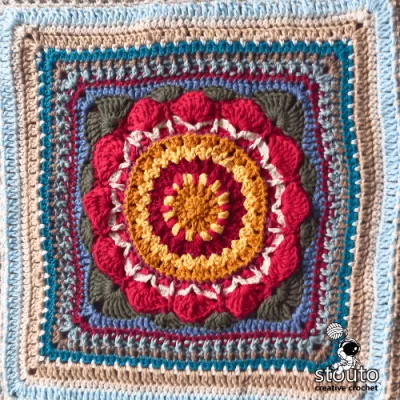
Bold Petal Circle Square
Starting with 2 double crochet together stitches for a striking circular center, this square blossoms into front post V-stitches and treble shell stitch petals for a bold, raised flower.
Why You’ll Love This Granny Square Blanket Pattern
- Perfect for modern and traditional homes
- Ideal for gifts, heirloom projects, or statement blankets
- Easy to customize colors and size
- Designed for long-lasting beauty and durability
The Heirloom Flowers Granny Square Blanket Pattern combines the charm of classic granny squares with modern crochet design — a true standout among granny square blanket patterns.
Upgrade to the AD FREE PDF Pattern Version


Get the Crochet Blanket Pattern PDF
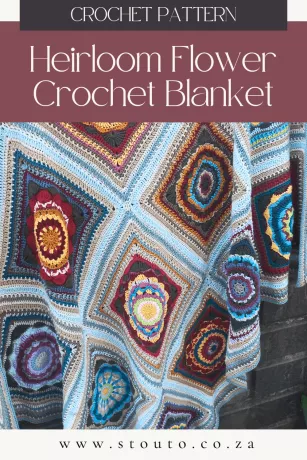
What’s Included in the PDF Pattern
When you purchase the downloadable PDF, you’ll receive:
- Full granny square blanket pattern instructions
- Four detailed flower granny square patterns
- Per-row step-by-step photos
- Written instructions in US crochet terms
- Flat Braid Join tutorial
- Border instructions for a finished, polished edge
The Modern Flower Heirloom Blanket is more than just a crochet blanket pattern—it’s a modern, textured, heirloom-quality project you’ll love making and sharing.
Ready to start?
Download the PDF today.
⚠️ This pdf pattern is for personal use only. Please do not copy or redistribute.Please share and link to website pattern page, if you wish to share free pattern.
Materials & Tools
| Hook | 3mm Crochet Hooks |
|---|---|
| Yarn Weight | Double Crochet (DK) Cotton Yarn |
| Fibre Type | Double Crochet (DK) Cotton Yarn |
| Yarn Needed | See yarn usage guidelines for yarn usage breakdown |
| Finished Size | 33 x 33 cm / 13 x 13 inches |
Materials, Yarn & Finished Size
This pattern uses DK (Double Knitting) weight yarn, also known as 3/Light or 8-ply in some regions. Cotton yarn is recommended, as it highlights the textured stitches beautifully and works especially well for floral granny square blanket patterns. The sample and photo tutorial use 100% cotton DK yarn.
Yarn used in examples:
- Yarn weight: DK / 3 Light / 8-ply
- Fibre: 100% Cotton
- Ball weight: 50 g
- Length: 100 m per ball
You may use any yarn you enjoy. Keep in mind:
- Lighter yarn and a smaller hook will produce smaller squares and a smaller blanket.
- Heavier yarn and a larger hook will produce larger squares and a larger blanket.
- This pattern works well as a stash buster, so feel free to mix colours and yarns of the same weight.
Crochet hook:
- 3 mm / US C-2 / UK 11 (10) - (Used for the example yarn)
Square size:
Heirloom Flowers square: 33 × 33 cm / 13 × 13 inches
Blanket size:
Approx. 110 × 145 cm / 44 × 56 inches
Made using 12 large squares
Yarn Requirements
- Approx. 400 m will make 3–4 large squares
- Using 5 colours per square (100 m each), you will get at least 3 large squares
- 12 squares total: approx. 4,800 m
- Border and finishing yarn: approx. 1,000–1,200 m
- Average yarn used per 4 large squares: 500–600 m
Yarn Calculator
Not sure how much yarn you'll need for your next crochet project?
Use our yarn calculator to estimate the amount of yarn required based on your project size, yarn weight, and stitch pattern.
It's a quick and easy way to plan your materials before you start crocheting.
Pattern Instructions
Pattern Notes
- Example blanket layout: 3 × 4 granny squares
- Example finished size: 110 × 145 cm / 44 × 56 inches
Quick Tips for Crocheting Granny Squares
- Count stitches at the end of every round
- Use stitch markers for corners
- Keep tension consistent across all squares
- Block squares lightly before joining for best results
Construction Overview
- Gather Your Materials
- Check Pattern Notes
- Determining Your Blanket Size
- Make Your Granny Squares
- Blocking Your Squares
- Joining the Granny Squares
- Final Border
- Finishing & Weaving in Ends
- Care for your Blanket
Resizing Guide
How Many Skeins of Yarn Do I Need?
Yarn usage depends on your chosen yarn, hook size, and blanket size:
- Pattern example: 12 large flower squares using DK cotton (50 g = 100 m) require approximately 4800 m for the squares, plus 1000–1200 m for the border and finishing.
- Per square estimate: Each square uses roughly 400 m of DK yarn.
- Custom sizes: Use the Resizing & Yarn Choice Guide below to calculate total squares and yarn for your desired blanket size.
Tip: This pattern is also a great stash-buster, perfect for using leftover yarn from other projects.
What Size Should a Crochet Blanket Be?
Blanket size is completely customizable:
- Example size: 110 × 145 cm / 44 × 56 inches, made from 12 squares (33 × 33 cm each).
- Smaller blankets: Remove rows or columns to make a baby blanket or lap throw.
- Larger blankets: Add extra squares to create a full-size bedspread or oversized throw.
Steps to resize your crochet blanket pattern:
1. Make one test square with your chosen yarn and hook, and block it if needed.
2. Measure the finished square to see how big each one will be.
3. Decide how many squares you need across (width) and down (height) to reach your target blanket size.
4. Adjust the border rounds for longer or shorter edges as needed.
Using Different Yarn Weights
You can use different yarn weights for this crochet blanket pattern, but here’s what to keep in mind:
- Heavier yarn (Aran/Worsted): Squares will be larger and thicker, so you’ll need fewer squares for the same overall size.
- Lighter yarn (Sport/Fingering): Squares will be smaller, requiring more squares for the same blanket dimensions.
- Hook size: Use the recommended hook for your yarn, or adjust slightly for tighter or looser stitches.
Tip: Make a test square to see how the new yarn weight and hook affect size and drape before committing to the full blanket.
Resizing & Joining Squares
- Add or remove squares to adjust width and height.
- Check stitch counts along each side of your squares so joining remains simple and neat.
- Keep hook and yarn consistent across all squares in one blanket.
- Use the Flat Braid Join (or your preferred joining method) to attach squares cleanly.
- Adjust border rounds based on the new number of squares to maintain balanced edges.
Yarn Usage & Calculation
1. Crochet one full square and measure how much yarn it uses.
2. Multiply by the total number of squares you plan to make.
3. Add extra for border and finishing (pattern suggests 1000–1200 m).
This method ensures you have enough yarn for your custom-sized blanket without overbuying or running short.
Final Tips
- Plan your color placement, especially if adding or removing rows or columns.
- Weave in ends as you go to save finishing time.
- Stick to the same hook and yarn weight for consistent square size and easy joining.
Written Instructions
2. Check Pattern Notes
Skill Level
This granny square blanket pattern is best suited for confident beginners to intermediate crocheters. You should be comfortable working in the round and following written crochet instructions.
Tension / Gauge
Gauge is not critical, but it is strongly recommended to use the same yarn and hook for all squares to ensure they match in size.
Pattern Language & Structure
Written in standard US crochet terminology
Each square has:
- Its own pattern page
- Its own stitch abbreviations
- Per‑round photo tutorial
- Shorthand stitch notes for easy repeats
Techniques Used
- All granny squares are worked in the round
- Maintaining correct stitch counts per side is essential for joining
- Working in yarn ends as you go is recommended
Skills Required
- Working crochet stitches in the round
- Changing yarn colours
- Finishing and fastening off rows
This is not a step‑by‑step beginner tutorial, but clear images and diagrams are provided for support.
3. Determining Your Blanket Size
The finished size of your granny square blanket depends on:
- Number of squares
- Square size
- Yarn weight
Example Size (DK Yarn, 3 mm Hook)
| Blanket Size | Layout | Approx. Size |
| Baby | 2 × 3 | 75 × 95 cm |
| Lap / Throw | 3 × 4 | 110 × 145 cm |
| Twin | 4 × 5 | 145 × 190 cm |
| Queen | 6 × 7 | 220 × 240 cm |
Pattern Reference
This page is part of a larger crochet pattern and is intended as a companion tutorial or stitch reference. For complete instructions, materials, sizing information, and all pattern sections, please visit the main pattern page.Step by Step
⚠️ This pattern is for personal use only. Please do not copy or redistribute.
3.Make Your Granny Squares
Create 3 of each square for the example blanket size, or adjust quantities using the sizing table above.
Each square pattern :
- Is written in standard US crochet terminology with notes on UK Term conversions.
- Has its own set of pattern instructions.
- Has its own set of stitch abbreviations and additional terminology
- Has a row photo tutorial.
- Has per row shorthand notes which assist in redoing the square multiple times.
Follow the individual pattern pages:
- Daisy‑Style Textured Square
- Bold Petal Circle Square
- Layered Petal Bloom Square
- Spiked‑Tip Modern Flower Square
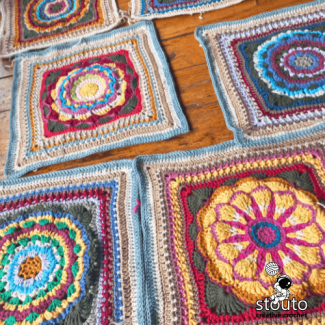
5. Blocking Your Squares
Lightly block each granny square to the same size before joining. This ensures:
Clean edges
Accurate alignment
A professional finished look
6. Joining the Granny Squares
Join all squares using the Flat Braid Join‑As‑You‑Go method. This join creates a decorative, flexible connection without bulky seams.
Tips:
- Join squares as you complete the final round
- Keep chain loops consistent
- Join at corner chain spaces only

Flat Braid Join
For a polished, professional finish, this granny square blanket pattern uses the Flat Braid Join-As-You-Go method. This crochet join creates a decorative, flexible connection between squares without bulky seams or extensive sewing.
Flat Braid Join Tips:
- Join squares as you complete the final round
- Use consistent chain loops for even spacing
- Maintain relaxed tension for a flat, flexible join
- Always join at chain spaces for clean corners
This join method also allows you to easily add more granny squares later if you decide to increase the size of your blanket.
Flat Braid Join – 12 Large Squares (4 × 3 Layout)
Abbreviations:
- ch = chain
- sc = single crochet
- sl st = slip stitch
- sp = space
- sk = skip
Notes:
- Right side (RS) of squares always faces you.
- Each square has 64 stitches per side + corner ch-sp.
- Join uses 1 sc, ch 2, sk 2, 1 sc repeat with slip stitch connections between squares.
Step 1: Prepare Squares
Lay out 12 squares in a 4 × 3 grid:
- Row 1 (top): Squares 1 – 4
- Row 2 (middle): Squares 5 – 8
- Row 3 (bottom): Squares 9 – 12
Step 2: Join First Square (Square 1)
- Start in the top left corner of square 1.
- In corner ch-sp: 1 sc, ch 2, 1 sc.
- Along first side:
ch 2, sk 2, 1 sc in next sp
repeat across 64 sts to the next corner.
In corner: 1 sc, ch 2, 1 sc.
Continue along next side:
ch 2, sk 2, 1 sc in sp
Repeat across 64 sts to the next corner.
In the corner: 1 sc, ch 2, 1 sc, ch 2 (ready to join the next square).
Step 3: Join Next Square in Row (Square 2)
- Place Square 2 to the left of Square 1, RS facing up.
- In the corner of Square 2: 1 sc, ch 2, 1 sc. sl st into corner of Square 1 to connect.
Join sides:
1. On Square 2: ch 2, sk 2, 1 sc in sp
2. sl st into matching sp on Square 1.
3. Repeat until the next corner.
4. In corner of Square 2: 1 sc, ch 2, 1 sc
5. sl st into the corner of Square 1 to connect corners.
6. Continue around Square 2 alone:
ch 2, sk 2, 1 sc across next side (64 sts) to corner, 1 sc, ch 2, 1 sc in corner
ch 2, sk 2, 1 sc across final side (64 sts) to corner, 1 sc, ch 2, 1 sc, ch 2 to join next square
Step 4: Repeat for Squares 3 & 4 in Row 1
Repeat Step 3 for Squares 3 and 4, joining each to the previous square using the same flat braid sequence.
When Row 1 is complete, you have 4 joined squares in a strip.
Step 5: Join Row 2 (Squares 5 – 8)
Repeat Steps 2 – 4 for Row 2, joining Squares 5–8 into a strip the same way as Row 1.
Step 6: Join Row 3 (Squares 9 – 12)
Repeat Steps 2 – 4 for Row 3, joining Squares 9–12 into a strip the same way as Row 1.
Step 7: Join Horizontal Seams Between Rows
- Place Row 1 and Row 2 RS up, edges touching.
- Start at the corner: 1 sc, ch 2, 1 sc in Row 2 corner, sl st into Row 1 corner to join.
- Join sides with ch 2, sk 2, 1 sc in Row 2 → sl st in Row 1 sp.
- Repeat across the entire seam until all squares in Row 2 are joined to Row 1.
- Repeat to join Row 3 to Row 2 the same way.
7. Final Border
Complete the blanket with a simple border of your choice. A clean, understated border works best to highlight the textured flower granny squares.
Border
Round 1
Join in corner chain space, ch2 - counts as first hdc of in the repeat below
*2hdc, ch2, 2hdc in corner ch-sp,1hdc into each st of side - before corner repeat from * 3 more times per side. Join with slip stitch in starting chain space. Finish off tail, work ends.
Round 2
Join new color in corner ch-sp,ch3 counts as first dc for repeat below,
*2dc,ch2,2dc in corner ch-sp - 1fpdc around post of next st, 1bpdc around post of next st,
Repeat from * for all stitches and all sides of the square.
Join with a slip stitch into the starting chain stitch finish off color.
Round 3
Join new color in corner ch-sp,ch3 counts as first dc for repeat below
*2hdc,ch2,2hdc in corner ch-sp - 1fphdc around post of next st, 1bphdc around post of next st,
Repeat from * for all stitches and all sides of the square.
Join with a slip stitch into the starting chain stitch finish off color.
Round 4
Join in corner chain space, ch2 - counts as first hdc of in the repeat below
*2hdc, ch2, 2hdc in corner ch-sp, 1hdc into each st of side - before corner - repeat from * 3 more times per side. Join with slip stitch in starting chain space. Finish off tail, work ends.
Round 5
Join color in corner chain space with SC stitch counts as first sc stitch for repeat below;
*1sc,ch2,1sc in corner chain space ,**ch2, skip 2 sts, 1sc in space between next two sts repeat** until end of side - repeat from * for each side Join with slip stitch in the first sc stitch and finish off color.
Round 6
Join new color in corner 2ch-sp, ch3 counts as first dc for repeat below
*2dc,ch2,2dc in corner 2ch-sp, **2dc in next 2ch-sp,
Repeat from, ** across for side, repeat from * for each side.
Join with a slip stitch into the starting chain stitch.
Round 7
Join in corner chain space chain 2 counts as first hdc leg of pattern repeat below
*2hdc,ch2,2hdc in corner chain space, 1hdc into each dc stitch,
- repeat for each side of the square.
Finish off ends.
Round 8
Join in corner chain space chain 3 counts as first dc leg of pattern repeat below
*2dc,ch2,2dc in corner chain space, 1dc into each dc stitch,
- repeat for each side of the square.
Finish off ends.
8. Finishing & Weaving in Ends
- Secure all yarn ends firmly
- Weave ends along stitch paths for durability
- Trim neatly
9. Care Guide for Granny Square Blankets
- Cotton blankets: machine wash cool, lay flat or tumble dry low
- Avoid high heat to preserve stitch definition
- Store folded or draped, not hung
This Granny Square Blanket Pattern Modern Heirloom Flower Crochet page serves as the main free pattern hub. Bookmark it and return anytime as you work through each square and assemble your blanket.
What Other Crocheters Say
This pattern hasn’t been reviewed yet.
Be the first to share your experience and help other crocheters.
Made it work? Share your result
Post a ReviewPattern Copyright & Usage
This crochet pattern and all associated content are the original work of Stouto Crochet.
- ✔️ Personal use allowed
- ✔️ Sell finished handmade items (small-scale)
- ❌ Do not copy, rewrite, or redistribute
- ❌ Do not share or resell PDF patterns
AI & Content Use: This pattern may not be reproduced or used to train AI systems.
Explore More Crochet Tutorials on the Website
If you need extra help while working on your stitch sampler blanket, you can explore the crochet tutorials section on the website. These guides explain crochet stitches, techniques, and pattern methods in a clear and beginner-friendly way.
You’ll find helpful stitch tutorials, visual diagrams, and step-by-step guides that make it easier to learn new stitches and improve your crochet skills while completing your project.
Feel free to explore the additional sections of our website for even more crochet patterns, helpful tutorials, and creative inspiration.
Each section is thoughtfully organized to make it easy to find exactly what you’re looking for and to support you at every stage of your crochet journey.
Crochet Pattern FAQ

