
Step-by-step instructions, yarn tips, joining methods, edging, and finishing included. Perfect for beginners!
Looking for a fun and colorful crochet project that’s perfect for beginners?
The African Daisies Blanket Small Granny Square Blanket is a beautiful, beginner-friendly pattern built from delicate floral granny squares. This guide walks you through everything you need from choosing yarn and hooks to joining squares and adding a finishing border so you can create a cozy handmade blanket full of charm and texture.
35% Raverly Sale
About This Pattern

Why You’ll Love This African Daisies Small Granny Square Blanket
Granny squares have always been a staple in crochet and for good reason! They’re quick, portable, and endlessly customizable. Small Flower squares combines the traditional charm of granny squares with a fresh floral twist, creating a stunning patchwork that’s perfect as a throw, baby blanket, or bedspread.
This project is ideal for:
- Beginners learning to crochet in the round
- Crocheters who love colorful, stash-busting projects
- Makers looking for a relaxing, step-by-step project
What You’ll Learn in This Small Flower Squares Blanket Tutorial
This African daisies blanket tutorial includes everything you need to start and finish your project with confidence:
- Step-by-step instructions for four unique small crochet flower square designs
- How to join granny squares neatly using the 3dc cable join
- Tips on selecting yarn, color planning, and layout
- How to add a beautiful edging and finish your blanket
- Quick charts for blanket sizes and yarn requirements
Whether you make one flower square or a full blanket, you’ll end up with something that’s uniquely yours.
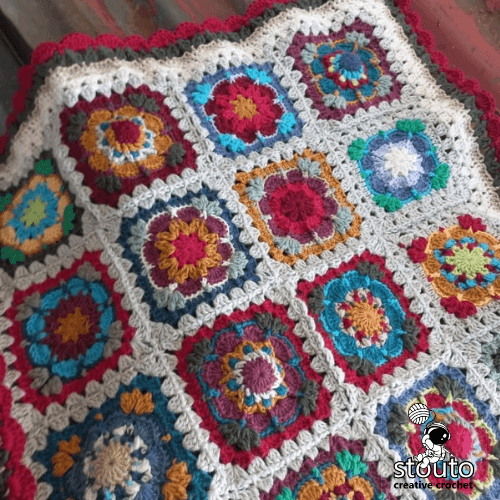
Free Granny Square Pattern Crochet Tutorial (Step-by-Step)
This tutorial includes four unique flower-inspired granny square designs. Each square can be used individually or combined to create a larger blanket. You may choose to use just one design for a uniform look, combine two for subtle variation, or mix all four to create a colorful patchwork effect. Each square is worked in the round and finished with neat edges, ensuring that they join together seamlessly.
This project is ideal for:
- Beginners learning to crochet in the round
- Crocheters who love colorful, stash-busting projects
- Makers looking for a relaxing, step-by-step project
What You’ll Learn in This Tutorial
This free small flower squares blanket tutorial includes everything you need to start and finish your project with confidence:
- Step-by-step instructions for four unique flower square designs
- How to join granny squares neatly using the 3dc cable join
- Tips on selecting yarn, color planning, and layout
- How to add a beautiful edging and finish your blanket
- Quick charts for blanket sizes and yarn requirements
Whether you make one flower square or a full blanket, you’ll end up with something that’s uniquely yours.
About the Flower Squares
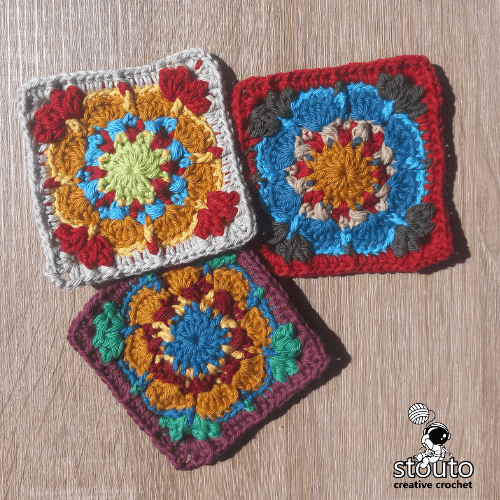
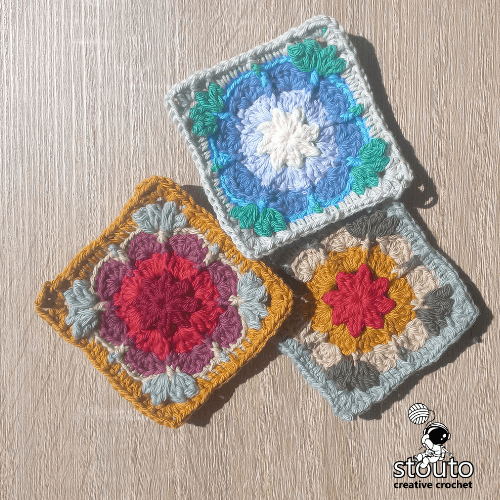
Each of the four small flower granny squares features its own unique texture and personality:
- Petal Burst Square A bold, layered floral design with front-post texture.
- Radiant Puff Flower Soft puff stitches and airy chains for a delicate look.
- Puff Petals & V-Stitches A blend of puff and V-stitches that’s perfect for color play.
- Cluster Bloom Square A slightly geometric floral motif with dramatic texture.
You can mix all four designs for a vibrant patchwork or repeat your favorite square for a more uniform blanket.

Petal Burst Design
Begins with a small floral center created from double crochets worked into a magic ringShell stitches radiate outward, forming layered petals, while a round of front-post stitches adds texture and definition. Chain spaces and strategic increases shape the square, giving it a clean and structured appearance. This design is bold and textured, making it a standout piece in any blanket layout.

Radiant Puff Flower
Starts with a dense circle of double crochets, forming the base for front-post stitches that radiate outward like flower spokes.Puff stitches and chain spaces create airy petals, while alternating shells and textured stitches build depth. The resulting square has a delicate, lacy appearance that works beautifully in combination with other squares, especially when using complementary colors for contrast and balance.

Puff Petals and V-Stitches
Combines puff stitches with V-stitches to create a visually engaging flower motif. Starting with a circle of double crochets, chains and skipped stitches create a framework for the puff petals. Shell stitches and front-post details add texture and structure, resulting in a square that is both airy and sturdy. This design is ideal for experimenting with color changes, as the mix of openwork and textured stitches allows colors to blend and pop in unique ways.

Cluster Bloom Square
Begins with dramatic 3-double-crochet clusters worked into a magic ring to form a starburst-like center.Shells and front-post stitches layer petals outward, and the final rounds include hdc, fphdc, and dc2tog stitches to shape strong, defined corners. The result is a bold, slightly geometric floral square that stands out in any blanket and works well as a statement motif.
Each of these four squares is designed for symmetry, ensuring that when you combine them into a blanket, all edges align neatly.
Consistency in yarn weight and hook size is crucial to ensure that your squares fit together seamlessly and that the final blanket has a uniform appearance.
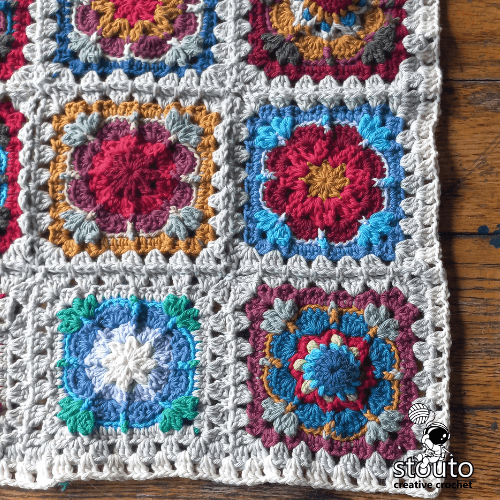
Finishing Touches
After joining your squares, crochet a border around the entire blanket to unify the design. A simple single crochet or scalloped edge works beautifully. Finish by weaving in ends and lightly blocking your blanket to help it lie flat and smooth.
Care Tips
- Machine wash gently (if using acrylic or blends) or hand wash cotton versions to keep your blanket soft and vibrant.
- Always reshape and dry flat to maintain its shape.
Upgrade to the AD FREE PDF Pattern Version


Granny squares are timeless, versatile, and beginner-friendly. Use this free granny square pattern crochet to create a beautiful flower blanket and share your results with the crochet community.
For a complete guide, the **pattern PDF tutorial** includes:
- Printable PDF for desktop or mobile.
- 8 flower granny square patterns in one file.
- Per-row photo tutorials, detailed written instructions.
- Quick-reference shorthand for reworking squares.
- Yarn length and color allocation guidance.
- Step-by-step joining instructions with diagrams.
- Written in US crochet terminology.
Whether creating a single cozy square or a full blanket, this all-in-one guide ensures your project is fun, clear, and beautifully finished. Start crocheting today and turn your granny squares into something truly special!
⚠️ This pdf pattern is for personal use only. Please do not copy or redistribute.Please share and link to website pattern page, if you wish to share free pattern.
Materials & Tools
| Hook | 3.5 mm Crochet Hook |
|---|---|
| Yarn Weight | Double Crochet (DK) Cotton Yarn |
| Fibre Type | Cotton–Acrylic Blends |
| Other Tools |

How Many Squares Do You Need for the African Daiaies Small Flower Squares Blanket?
One of the most common questions beginners ask when following a free granny square pattern crochet tutorial is how many squares they need to complete their blanket. The answer depends on the final dimensions you want and the size of your individual squares.
Planning your blanket in advance helps you estimate yarn requirements and ensures that you have enough materials to complete the project without interruptions.
Blanket Size & Yarn Estimates
Here’s a quick reference for planning your project:
| Blanket Size | Approx. Squares | Yarn (DK 50g) | Yarn (Worsted 100g) | Shop Yarn on Amazon |
| Baby (30”×36”) | 42 | 12–14 skeins | 6–7 skeins | Baby Blanket Yarns |
| Small Throw (40”×48”) | 80 | 20–22 skeins | 10–11 skeins | Colorful Throw Yarns |
| Large Throw (50”×60”) | 120 | 28–30 skeins | 14–15 skeins | Earth Toned Yarns |
| Twin (66”×90”) | 240 | 55–60 skeins | 27–30 skeins | Neon Colored Yarns |
| Queen (90”×100”) | 360 | 80–85 skeins | 40–43 skeins | Light Pastel Toned Yarn |
| King (108”×108”) | 400 | 90–95 skeins | 45–48 skeins | Bold and Bright Colored Yarns |
I earn a small commission from qualifying purchases via these Amazon affiliate links.
Each square measures about 5 inches (12–13 cm), but you can adjust your yarn weight or hook size to create smaller or larger squares.

Yarn tip: This pattern works beautifully with cotton, acrylic, or blended yarns. Acrylic is affordable and easy to care for, while cotton gives crisp stitch definition for floral details.
Yarn Calculator
Not sure how much yarn you'll need for your next crochet project?
Use our yarn calculator to estimate the amount of yarn required based on your project size, yarn weight, and stitch pattern.
It's a quick and easy way to plan your materials before you start crocheting.
Pattern Instructions
Pattern Notes

Troubleshooting Tips
- Even with a detailed free granny square pattern crochet project , mistakes can happen.
- Crooked squares may result from uneven tension or missed stitches. If you notice curling edges, consider adding extra border rounds or blocking the squares more thoroughly.
- Uneven joins can often be corrected by checking your gauge and adjusting your hook size if necessary.
- When experimenting with colors, be mindful of pooling and contrast to ensure your blanket maintains a balanced appearance.
- Patience and attention to detail are crucial for overcoming these common challenges and achieving a polished final product.
Optional Variations
- Once you are comfortable with the basic free granny square pattern crochet tutorial, you can experiment with numerous variations.
- You might use only one flower square for a uniform look or combine all four to create a dynamic patchwork blanket. Adjusting the size of your squares allows for smaller baby blankets or larger bedspreads.
- Additionally, you can apply the same techniques to create cushion covers, throws, or even wall hangings.
- These variations provide endless opportunities to express your creativity and make your crochet projects uniquely yours.
Construction Overview
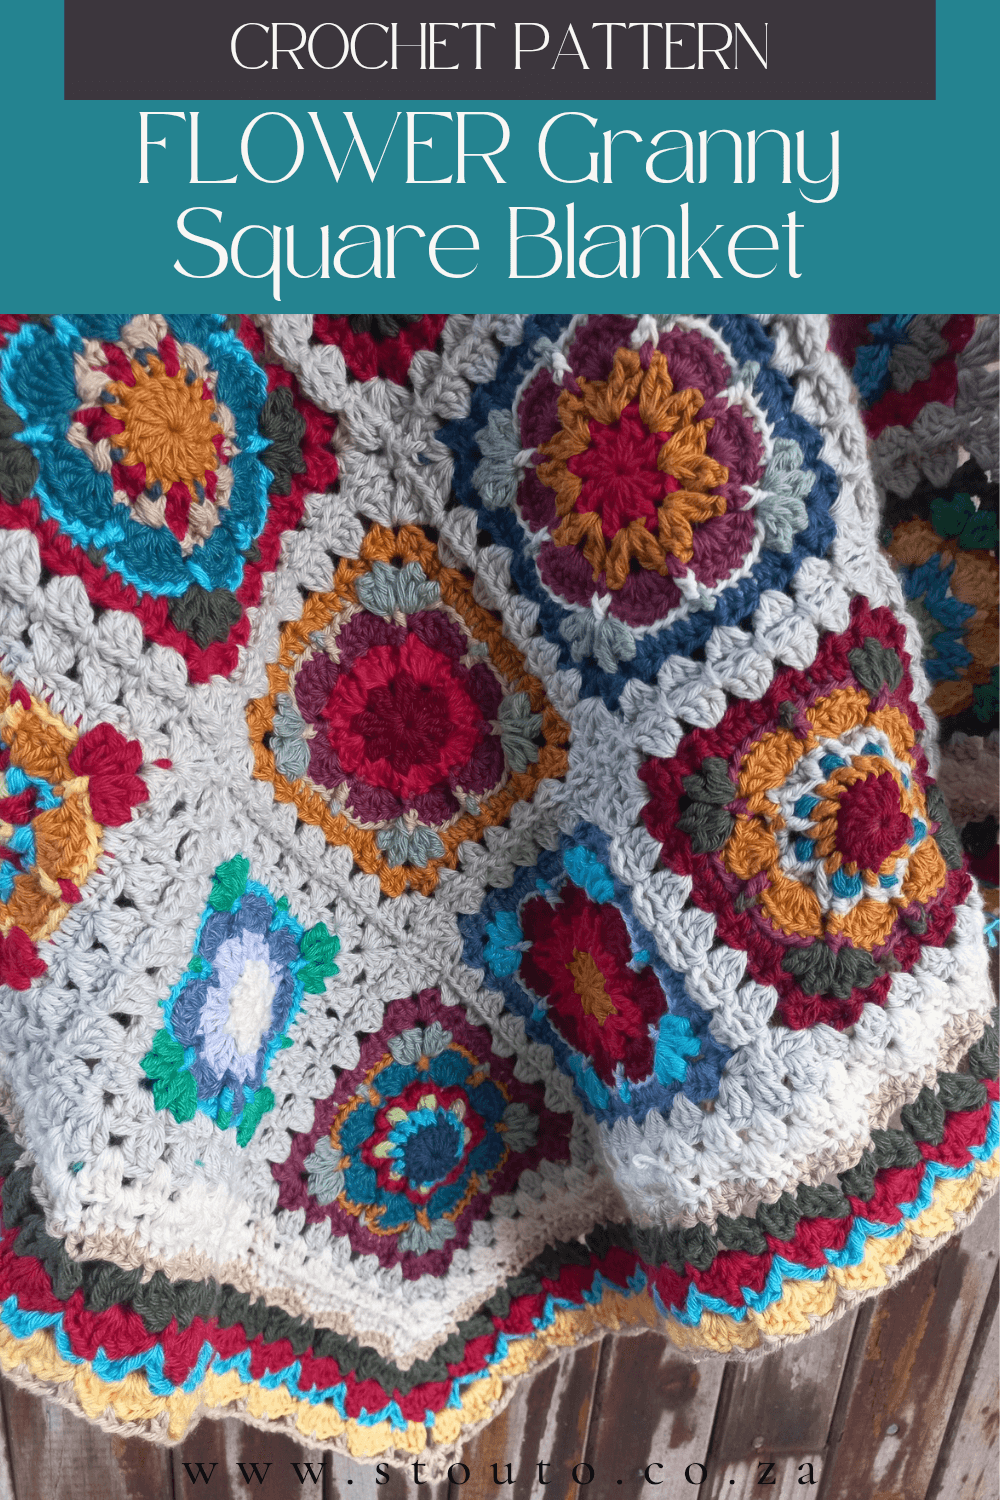
Written Instructions
ASmall Flower Granny Squares Blanket – Free Crochet Pattern & Tutorial

Be sure to save and pin this page !!
Whether you’re making a single cozy square or a full blanket, this all-in-one guide ensures your project is fun, clear, and beautifully finished. Start crocheting today and turn your granny squares into something truly special!
Here’s a quick, step-by-step guide for making a granny square blanket using a free granny square pattern crochet tutorial approach:
Step 1: Gather Your Supplies
Before you begin, make sure you have everything ready:
- Yarn: Worsted weight or DK yarn in several colors
- Hook: Size recommended for your yarn (commonly 4 mm – 5 mm)
- Notions: Scissors, tapestry needle
- Optional: Pillow insert or stuffing if making cushions instead of a blanket
Materials used for example blanket
- Crochet Hook
- 3mm / C-2 / D-3 / UK : 11
- Yarn used in photo tutorial : DK Cotton: 50g = 100 m per skein/ball
Example square sizes
- Example Square Single Size : 10 x 10 cm / 4 x 4 inches
- Example Single Square with Join :11.5 x 11,5 cm / 5 x 5 inches
Pattern Notes & Variations
Abbreviations, References,
- Pattern is written in standard US crochet terminology.
- Each square has its own set of pattern instructions.
- Each square has its own set of stitch abbreviations and additional terminology
- Each large square has a row photo tutorial.
- Each large square pattern has per row shorthand notes which assist in redoing the square multiple times.
Techniques
- All crochet squares are worked in the round, ensuring that your final row count per side is correct or you will struggle to join your square at a late stage.
- Gauge, it's best to stick to the same yarn weight and crochet hook throughout making your squares, or your squares will not match up.
- Work ends, as you go will help you at the end when it comes to finishing the blanket unless you love spending a day at least to work on loose ends.
Skills required
- Understand the basics of working in the round.
- Joining different yarn colors and how to end and finish rows.
- The pattern is not a step-by-step tutorial, per-round images are available as well as a stitch diagram
- Written instruction notes
- Each row has a shorthand note for stitches and stitch counts.
- Under each fully written instruction. E.g.
(8 x 1 fphdc, 6hdc st(s))
This will assist you when working the squares again as you can simply reference the shorthand.
Optional Variations
- One-color blanket: Keep all rounds the same color for a uniform look.
- Colorful patchwork: Mix and match colors in each flower or border round.
- Stash buster: Use leftover yarn from other projects for a unique, vibrant blanket.
Quick Yarn Usage Guide
- Lightweight yarn (DK/3-Light) : Best for smaller squares, delicate blankets.
- Acrylic yarn : Beginner-friendly, affordable, machine washable.
- Cotton yarn : Breathable, summer-friendly, holds shape well.
- Wool/wool-blend : Warm, slightly stretchy, heirloom quality.
Tip: Stick to the same yarn and hook across all squares to keep uniform gauge.
How to Start a Small Flower Granny Squares Blanket

From there, the first round of stitches is worked into the ring, usually a combination of chains and basic stitches such as single crochet, half-double crochet, or double crochet. The initial round sets the foundation for your square, establishing the placement of corners and ensuring symmetry as you continue outward.

Step 2: Crochet Your Flower Squares
Each square is worked in US terms; for UK terms, refer to the abbreviations below.
US → UK Terms Reference:
- dc → tr
- hdc → htr
- sc → dc
- tr → dtr
- fphdc → front post htr
- fpdc → front post tr
Each motif starts in the round and finishes as a square, making them easy to join. Choose from these four flower square designs:
- Small Flower Square 1 – Petal Burst
Layered petals framed into a neat square, using double crochets, shells, and front-post stitches. - Small Flower Square 2 – Radiant Puff Flower
Airy puff-stitch petals combined with shell stitches for a delicate look. - Small Flower Square 3 – Puff Petals with V-Stitches
Decorative openwork with puffy petals and textured borders. - Small Flower Square 4 – Cluster Bloom Square
Star-like floral square with strong structure using clusters and front-post stitches.
Step 3: How Many Squares Do You Need?
The size of your blanket depends on how many squares you make. Each square measures about 5 inches (12–13 cm).
| Blanket Size | Approx. Squares | Yarn (DK 50g) | Yarn (Worsted 100g) |
| Baby (30”×36”) | 42 | 12–14 skeins | 6–7 skeins |
| Small Throw (40”×48”) | 80 | 20–22 skeins | 10–11 skeins |
| Large Throw (50”×60”) | 120 | 28–30 skeins | 14–15 skeins |
| Twin (66”×90”) | 240 | 55–60 skeins | 27–30 skeins |
| Queen (90”×100”) | 360 | 80–85 skeins | 40–43 skeins |
| King (108”×108”) | 400 | 90–95 skeins | 45–48 skeins |
For more blanket size inspiration, check out our more granny square blanket patterns
Step 4: Make Your Crochet Flower Squares
- All squares start with making a magic ring
- Build Subsequent Rounds
- Complete all rows for pattern
- Ensure that your finished stitches per correspond with the pattern notes
- Change colors if desired, using a new color at the start of a round.
- Fasten off the yarn and weave in the ends neatly with a tapestry needle.
- Repeat steps to create as many squares as needed for your blanket size.
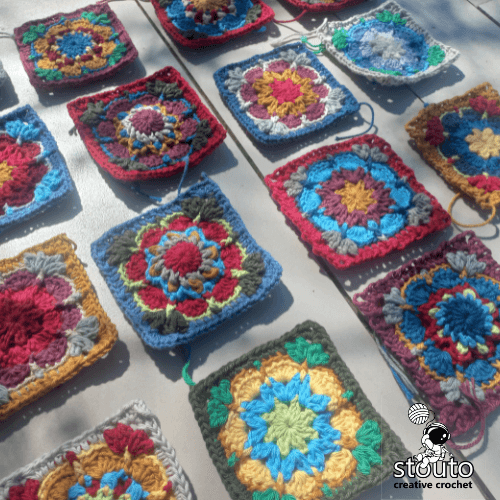
Step 5: Arrange Your Squares
- Lay completed squares out on a large surface to visualize your blanket layout, experimenting with color combinations, gradients, or random arrangements to find a design that pleases you.
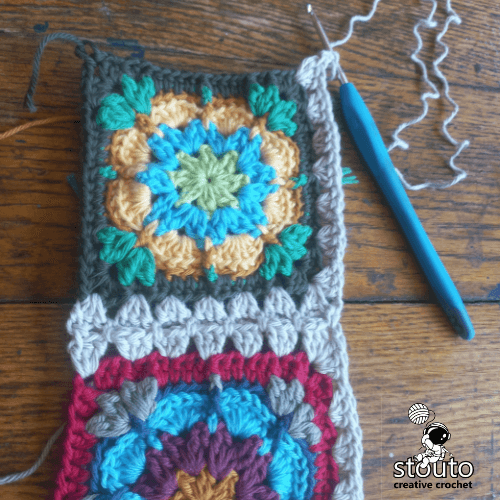
- Once you are satisfied with the arrangement, join the squares using your preferred method, such as the 3dc cable stitch, which not only secures them but also adds subtle decorative texture.
- After joining, add a border or edging to unify the blanket and provide a polished finish. Taking your time with each step ensures a professional-looking result and makes the process enjoyable.
Step 6: Assemble the Granny Square Blanket
We recommend the Continuous 3-dc Crochet Join (US) to connect squares beautifully:
1. Lay your squares in rows and columns in the order you want.
2. Attach yarn to the corner of the first square. Chain 3 (counts as dc) and work 2 dc in the same corner.
3. Continue along the side, placing 3-dc clusters across the edges.
4. Connect each new square right sides facing each other, matching corner spaces.
5. Spiral around rows and columns until all squares are joined.
6. Finish with an outer edge to tidy your blanket.

For detailed step-by-step joining instructions, see pattern instructions below or the downloadable pattern file.

Step 7: How to Edge Your Blanket
A border ties the blanket together and gives it a polished finish. Suggested border:
1. Round 1: Half double crochet (hdc) around blanket, 2 hdc + ch 2 + 2 hdc in each corner.
2. Round 2: 3-dc clusters with chain spaces along sides.
3. Round 3: 6-dc shells with sc between clusters.
4. Round 4–5: Decorative shells, dc, and chain stitches as shown in diagrams.
You can choose to stop here or continue adding extra rounds for a wider border.
Step 8: Block the Blanket
- Lightly dampen and pin the blanket or each square to a flat surface.
- Shape corners and edges evenly, then let dry completely.
Step 9: Care and Enjoy
- Wash according to yarn instructions.
- Use your blanket as a cozy throw, baby blanket, or decorative piece.
Care for Your Blanket
- Acrylic: Machine wash gentle, cold water, lay flat to dry.
- Cotton: Hand wash or gentle cycle, reshape while drying.
- Blends: Follow yarn label instructions.
Quick Stitch Guide
All stitch instructions are available in both US Crochet Terminology and UK Crochet Terminology, making it easy to follow along using the terms you are most familiar with.
If you are new to any of the stitches used in this pattern, we recommend reviewing the relevant stitch guide before starting. Each guide includes step-by-step instructions, helpful tips, and stitch terminology conversions where applicable.
Take your time, practice any unfamiliar stitches, and most importantly—enjoy the process of creating your blanket one row at a time.
UK : ch-sp - chain space
AFR : Ks sp - Kettingsteek spasie
1. Make a slip knot on the hook.
2. Yarn over (yo).
3. Pull yarn through the loop on the hook. → 1 ch made.
4. Repeat for desired number of chains.
UK : tr - treble crochet
AFR : lb - Langbeentjie / dubblehekel
1. Yarn over.
2. Insert hook into stitch, pull up a loop (3 loops).
3. Yarn over and pull through first 2 loops (2 remain).
4. Yarn over and pull through last 2 loops.
UK : fptr - front post treble crochet
AFR : vblb / vslb - Voorste Been Langbeentjie / Voor Stam Langbeentjie / voorpaal-dubblehekel
1. Yarn over, insert hook front→back→front around post.
2. Yarn over, pull up loop (3 loops).
3. Yarn over, pull through first 2 loops, yarn over, pull through last 2 loops.
UK : fphtr - Front post half treble crochet
AFR : vbhlb / vshlb - Voorste Halwe Langbeen(tjies) / Voor Stam Halwe Langbeen(tjies)/ voorpaal half-dubble hekel
1. Yarn over, insert hook front→back→front around post.
2. Yarn over, pull up loop (3 loops).
3. Yarn over, pull through all 3 loops.
UK : fpdc - Front post double crochet
AFR : vbkb / vskb - Voorste Kortbeen(tjies) / Voor Stam Kortbeen(tjies) / voorpaal enkelhekel
1. Insert hook front→back→front around the post of stitch below.
2. Yarn over, pull up loop (2 loops).
3. Yarn over, pull through both loops.
UK : htr - half treble crochet
AFR : hlb - Halwe Langbeentjie / Half Lang Been / half-dubblehekel
1. Yarn over.
2. Insert hook into next stitch and pull up a loop (3 loops).
3. Yarn over and pull through all 3 loops.
UK : puff - puff stitch
AFR : ps - pof steek / pynapple Steek
1. Yarn over, insert hook, pull up loop — repeat specified number of times (e.g., 3–5 pulls) so multiple loops on hook.
2. Yarn over and pull through all loops, ch1 to secure (if pattern asks).
UK : sh - Shell stitch
AFR : skulp - skulp steek
1. Work 3 dc of any (hdc,dc,tr) into same stitch or space.
2. Skip 2–3 sts depending on pattern, repeat.
UK : sl st - slip stitch
AFR : gls - glysteek
1. Insert hook into the stitch or space.
2. Yarn over and pull through the stitch and the loop on your hook (one motion).
3. Used to join rounds or move without height.
UK : sp after - space after
AFR : spa - Spasie Agter
Insert hook in space after marked stitch.
UK : sp before - space before
AFR : spv - Spasie Voor
Insert hook in space before marked stitch.
Pattern Reference
This page is part of a larger crochet pattern and is intended as a companion tutorial or stitch reference. For complete instructions, materials, sizing information, and all pattern sections, please visit the main pattern page.Step by Step
⚠️ This pattern is for personal use only. Please do not copy or redistribute.
Free African Daisies Small Flower Squares Blanket Pattern

Small Square Pattern : 1
Abbreviation
- bet: bet
- BLO: back loop only
- ch: chain
- ch-sp: chain space
- dc: double crochet
- fpdc: front post double crochet
- fphdc: front post half double crochet
- fptr: front post treble crochet
- fptr: front post tr
- hdc: half double crochet
- ps: puff stitch
- rep: repeat
- rnd: round
- sc: single crochet
- sh: shell
- sl: slipstitch
- sp: space
- st: stitch
- sts(s): stitches
- tr: treble crochet
Round 1
Start with a magic ring, sc, into magic ring, ch4, counts as 1 dc + ch 1, 1dc into the same st, * 1dc, ch1, 1dc, repeat from * 7 more times around, join with sl into the staring chain stitch, finish off color.
(8 x 1 dc, ch 1, 1 dc, st(s) in round)
Round 2
Join color in 1 ch-sp, ch 3, counts as first dc, 1dc, ch2, 2dc into the same ch-sp, * 2 dc, ch2, 2 dc into the next 1 ch-sp, rep from *, join with sl into top of ch 3, finish off color.
(8 x 2 dc, ch2, 2 dc, st(s) in round)
Round 3
Join color with *1sc into sp between 2dc st(s), 6 dc-shell into 2ch-sp,
repeat from * around, join with sl into the starting chain stitch, finish off color.
(8 x 6-dc-shells)
Round 4
Join color around sc stitch post, between 6dc-shell, from the previous round, chain 3, counts as *1 fpdc around sc st, work 1 hdc into each of the dc-shell sts, from the previous round, repeat from * around, join with sl into the starting chain stitch, finish off color.
(8 x 1 fpdc, 6hdc st(s))
Round 5
Join color in sp before, fpdc, with sc, ch2 - counts as first dc leg of dc2tog for repeat below,
* dc2tog, ch1, dc2tog, into sp before fpdc, ch2, dc2tog, ch 1, dc2tog in sp after fpdc, ch4, 1 fphdc round fpdc, ch4, repeat from * 3 times more round, to create square, join with sl into top of dc2tog, and finish off the color.
(4 x dc2tog, ch1, dc2tog, ch2, dc2tog, ch1, dc2tog, ch4, 1 fphdc, ch4, )
Round 6
Join color into corner 2 ch-sp, ch2, counts as 1st hdc of
*2 hdc into 2 ch-sp, 1 fphdc round dc2tog, 1hdc in 1 ch-sp, 1 fphdc round next dc2tog,
skip 1st hdc st worked into 6dc shell from round 4,
1 hdc into next 4 hdc sts from hdc sts worked in 6dc-shell from round 4, skip last hdc st. 1 fphdc around fphdc, skip 1st hdc st worked into 6dc shell from round 4, 1 hdc into next 4 hdc sts from hdc sts worked in 6dc-shell from round 4, skip last hdc st,1 fphdc round dc2tog, 1 hdc in 1ch-sp, 1 fphdc round next dc2tog, 2 hdc into 2 ch-sp, ch2, rep from * rnd, join with sl into top of staring hdc st, finish off color.
(4 x 2hdc, 1fphdc, 1hdc, 1fphdc, skip1 , 4hdc, 1 fphdc, 4hdc, skip 1, 1 fphdc, 1hdc, 1 fphdc, 2hdc, ch2 ) (19 sts per side)

Small Flower Blanket Free Square Pattern : 2
Abbreviation
- bet: bet
- BLO: back loop only
- ch: chain
- ch-sp: chain space
- dc: double crochet
- fpdc: front post double crochet
- fphdc: front post half double crochet
- fptr: front post treble crochet
- fptr: front post tr
- hdc: half double crochet
- ps: puff stitch
- rep: repeat
- rnd: round
- sc: single crochet
- sh: shell
- sl: slipstitch
- sp: space
- st: stitch
- sts(s): stitches
- tr: treble crochet
Round 1
Start with magic circle,
Sc, ch 3 into magic ring counts as first dc, work 15 x 1dc sts into magic ring, join with sl into top of ch, finish off color.
(16 x dc st(s))
Round 2
Join new color with sc round dc post, ch1,
*1 fpdc round next dc post, ch, rep from * around, join with sl into top of fpdc, finish off color.
(16 x 1 fpdc, ch 1 st(s))
Round 3
Join color round fpdc, *1 hdc-puff st round fpdc post, ch 3, skip next fpdc st, rep from * around, join with sl into top of puff st, finish off color.
(8 x 6-dc-shells)
Round 4
Join color round skipped dc post from round 3, ch 3, counts as fpdc for repeat below,
* 1 fpdc round skipped post, 3sc in 3ch-sp, from round 3,
1fpdc round same post as before,
1 fphdc round puff stitch, rep from * rnd, join with sl into top of fpdc, finish off color.
(8 x 6-dc-shells)
Round 5
Join color into Fphdc with sc, counts as first sc stitch of repeat below,
* fpsc round fphdc, skip 1st sc st from round4, 6dc-shell into 2nd sc st, skip next st, rep from * rnd, join with sl into top of fpsc, finish off color.
Round 6
Join color in round Fphdc from previous round, *1 Fpdc round Fphdc post, work 1 hdc into each of the 6dc-shell from previous round, rep from * around, join with sl into top of first Fpdc, finish off color.
(8 x 1 Fpdc, 6hdc st(s))
Round 7
Join color in sp before, fpdc, with sc, ch2 - counts as first dc leg of dc2tog for repeat below,
* dc2tog, ch1, dc2tog, into sp before fpdc, ch2, dc2tog, ch 1, dc2tog in sp after fpdc, ch4, 1 fphdc round fpdc, ch4, repeat from * 3 times more round, to create square, join with sl into top of dc2tog, and finish off the color.
(4 x dc2tog, ch1, dc2tog, ch2, dc2tog, ch1, dc2tog, ch4, 1 fphdc, ch4, )
Round 8
Join color into corner 2 ch-sp, ch2, counts as 1st hdc of
*2 hdc into 2 ch-sp, 1 fphdc round dc2tog, 1hdc in 1 ch-sp, 1 fphdc round next dc2tog,
skip 1st hdc st worked into 6dc shell from round 4,
1 hdc into next 4 hdc sts from hdc sts worked in 6dc-shell from round 4, skip last hdc st.
1 fphdc around fphdc,
skip 1st hdc st worked into 6dc shell from round 4,
1 hdc into next 4 hdc sts from hdc sts worked in 6dc-shell from round 4, skip last hdc st,
1 fphdc round dc2tog, 1 hdc in 1ch-sp, 1 fphdc round next dc2tog, 2 hdc into 2 ch-sp, ch2,
rep from * rnd, join with sl into top of staring hdc st, finish off color.
(4 x 2hdc, 1fphdc, 1hdc, 1fphdc, skip1 , 4hdc, 1 fphdc, 4hdc, skip 1, 1 fphdc, 1hdc, 1 fphdc, 2hdc, ch2 ) ( 19 sts per side)
Small Flower Square 3
Abbreviation
- bet: bet
- BLO: back loop only
- ch: chain
- ch-sp: chain space
- dc: double crochet
- fpdc: front post double crochet
- fphdc: front post half double crochet
- fptr: front post treble crochet
- fptr: front post tr
- hdc: half double crochet
- ps: puff stitch
- rep: repeat
- rnd: round
- sc: single crochet
- sh: shell
- sl: slipstitch
- sp: space
- st: stitch
- sts(s): stitches
- tr: treble crochet
Round 1
Sc, ch 3 into magic ring counts as first dc, make 15 more dc sts into magic ring, join with sl into the top of ch, finish off color.
(16 x dc st(s))
Round 2
Join color in dc stitch with sc st, counts as first 1sc for repeat below,
* 1sc in dc, ch3, sk next 1dc st, rep from * around, join with sl into the top of ch 4, finish off color.
(8 x dc, ch 1, fpdc, ch - st(s))
Round 3
Join color in skipped dc from round 2. ch 5, counts as 1dc + ch2 for repeat below
*1dc, ch2, 1dc into the same dc from round 2, 1bpsc, rep from * around, join with sl into the top of starting chain, finish off color.
(8 x dc-Vst, BPsc )
Round 4
Join new color with sc, around sc stitch from round 2, ch2 - counts as start of puff st, for repeat below,
* 1 puff st, round sc st from round 2, ch1, 1sc in next ch-sp, ch1, rep from * around, join with sl into top of first puff stitch, finish off the color.
(8 x 1 puff st, ch1, 1sc, ch1))
Round 5
Join color with sc into sc from round before - counts as first sc st for repeat below
*1sc in sc st, 6dc-shell into top stitch of puff stitch from round before, rep from * around, join with sl into first sc stitch, finish off color.
Round 6
Join new color in around sc stitch from round before, ch2, counts as 1fphc around sc for repeat below,
* 1 fphdc round sc, BLO, 1 sc st, in each of the next 6 dc sts from 6dc-shell, repeat from *, join with sl into the top of fphdc, finish off color.
(8 x 1 fphdc, BLO 6sc st(s))
Round 7
Join color in sp before, fpdc, with sc, ch2 - counts as first dc leg of dc2tog for repeat below,
* dc2tog, ch1, dc2tog, into sp before fpdc, ch2, dc2tog, ch 1, dc2tog in sp after fpdc, ch4, 1 fphdc round fpdc, ch4, repeat from * 3 times more round, to create square, join with sl into top of dc2tog, and finish off the color.
(4 x dc2tog, ch1, dc2tog, ch2, dc2tog, ch1, dc2tog, ch4, 1 fphdc, ch4, )
Round 8
Join color into corner 2 ch-sp, ch2, counts as 1st hdc of
*2 hdc into 2 ch-sp, 1 fphdc round dc2tog, 1hdc in 1 ch-sp, 1 fphdc round next dc2tog,
skip 1st hdc st worked into 6dc shell from round 4,
1 hdc into next 4 hdc sts from hdc sts worked in 6dc-shell from round 4, skip last hdc st.
1 fphdc around fphdc,
skip 1st hdc st worked into 6dc shell from round 4,
1 hdc into next 4 hdc sts from hdc sts worked in 6dc-shell from round 4, skip last hdc st,
1 fphdc round dc2tog, 1 hdc in 1ch-sp, 1 fphdc round next dc2tog, 2 hdc into 2 ch-sp, ch2,
rep from * rnd, join with sl into top of staring hdc st, finish off color.
(4 x 2hdc, 1fphdc, 1hdc, 1fphdc, skip1 , 4hdc, 1 fphdc, 4hdc, skip 1, 1 fphdc, 1hdc, 1 fphdc, 2hdc, ch2 ) ( 19 sts per side)
Small Flower Square 4
Abbreviation
- bet: bet
- BLO: back loop only
- ch: chain
- ch-sp: chain space
- dc: double crochet
- fpdc: front post double crochet
- fphdc: front post half double crochet
- fptr: front post treble crochet
- fptr: front post tr
- hdc: half double crochet
- ps: puff stitch
- rep: repeat
- rnd: round
- sc: single crochet
- sh: shell
- sl: slipstitch
- sp: space
- st: stitch
- sts(s): stitches
- tr: treble crochet
Round 1
Start with a magic ring,
Work 1sc into magic ring, ch3 - counts as first leg of 3dc for repeat below,
* 3dctog into magic ring, ch3, repeat 7 more times, join with sl into top of starting 3 dctog, finish off color.
(8 x 3dctog, ch3)
Round 2
Join new color around post of 3 dc2tog, with sc, - count as first fpsc stitch for repeat below
* 1fpsc around 3dctog, 5dc-shell into 3ch-sp, rep from * around, join with sl into the top of fpsc, finish off color.
(8 x 5dc(shell),1sc)
Round 3
Join new color around post of 3 dc2tog, with sc, - count as first fpsc stitch for repeat below
* fphdc round fpsc, 6dc-shell into 3rd stitch of 5 dc shell, skip next two dc sts(s), rep from * around, join with sl into top of ch 3, finish off color.
(8 x 6dc-shells, 1 fphdc)
Round 4
Join new color in round Fphdc from previous round, *1 fphdc round Fphdc post, 1 hdc into each of the 6dc-shell stitches, from previous round, rep from * around, join with sl into top of first Fpdc, finish off color.
(8 x 1 fphdc, 6hdc st(s))
Round 5
Join color in sp before, fpdc, with sc, ch2 - counts as first dc leg of dc2tog for repeat below,
* dc2tog, ch1, dc2tog, into sp before fpdc, ch2, dc2tog, ch 1, dc2tog in sp after fpdc, ch4, 1 fphdc round fpdc, ch4, repeat from * 3 times more round, to create square, join with sl into top of dc2tog, and finish off the color.
(4 x dc2tog, ch1, dc2tog, ch2, dc2tog, ch1, dc2tog, ch4, 1 fphdc, ch4, )
Round 6
Join color into corner 2 ch-sp, ch2, counts as 1st hdc of
*2 hdc into 2 ch-sp, 1 fphdc round dc2tog, 1hdc in 1 ch-sp, 1 fphdc round next dc2tog, skip 1st hdc st worked into 6dc shell from round 4,
1 hdc into next 4 hdc sts from hdc sts worked in 6dc-shell from round 4, skip last hdc st.
1 fphdc around fphdc,
skip 1st hdc st worked into 6dc shell from round 4,
1 hdc into next 4 hdc sts from hdc sts worked in 6dc-shell from round 4, skip last hdc st,
1 fphdc round dc2tog, 1 hdc in 1ch-sp, 1 fphdc round next dc2tog, 2 hdc into 2 ch-sp, ch2,
rep from * rnd, join with sl into top of staring hdc st, finish off color.
(4 x 2hdc, 1fphdc, 1hdc, 1fphdc, skip1 , 4hdc, 1 fphdc, 4hdc, skip 1, 1 fphdc, 1hdc, 1 fphdc, 2hdc, ch2 ) ( 19 sts per side)
Joining squares together
Joining squares you start at the red star as indicated in the diagram.
Continuous 3dc Crochet Join (US terms)
What this join looks like :
- A row of 3dc clusters runs between squares, like a tiny granny strip connecting them.
- It’s made all in one continuous round around the blanket (instead of stopping/starting at every seam).
- Perfect for flower or granny squares with chain spaces around the edges.
What you’ll need
- Your finished squares, blocked and laid out in rows/columns.
- Same yarn + hook used for your squares (or 0.5 mm bigger if you crochet tight).
- Stitch markers help keep track of rows/columns.
Step 1: Arrange squares
- Lay your squares in rows and columns in the order you want.
- You’ll join all squares in one row first, then continue across rows without cutting yarn.
Step 2: Starting the join - Red Star
- Start in the corner space of the first square (top-left of blanket).
- Attach yarn with a slip stitch.
- Chain 3 (counts as dc), work 2 dc in same corner → this makes the first half of a 3dc cluster.
Step 2 : Work across side - Grey Arrow
- You need to have 5 x 3dc clusters stitches between every corner
- after corner 3dc st,
- skip 2 sts 3dc in next st skip 3 sts,
- 3dc in next st, skip 2 sts,
- 3dc in next sts, skip 2 sts,
- 3dc in next sts skip 3 sts,
- 3dc in next st skip 2 -
- repeat stitches for corner
Step 3: Working between squares - Grey Arrow
- Work 3dc ch2 3dc into the corner
- Repeat step 2 along the next side of the square.
- Work 1 x 3dc into the corner space ch2
Step 4 : Join next square - Red Arrow
- Place square right side facing front against the completed square right face front
- 3dc into the corner ch-sp of next square,
- slip-stitch in the space after the 3dc of the square before - you should now have 3dc clusters across from one another if you open your work - for each square
- after corner 3dc st,
- new square - skip 2 sts 3dc in next st
- first square - skip 3dc - slip st in space after,
- new square - skip 3 sts,3dc in next st,
- first square - skip 3dc - slip st in space after
- new square - skip 2 sts 3dc in next sts,
- first square - skip 3dc - slip st in space after
- new square - skip 2 st s 3dc in next sts
- first square - skip 3dc - slip st in space after
- new square - skip 3 sts,3dc in next st skip 2 -
- first square - skip 3dc - slip st in space after
- repeat stitches for corner
Step 4: Turning the corner into next row
- Work along the outer edge until you reach the corner of the row follow instruction as mentioned in step 2.
- Turn with 3dc ch 2 3dc in corner ch-sp,
- Continue down the next vertical seam
- Repeat Step 4 to join the next square.
Step 5: Work all rows & columns
- Keep spiraling around your layout: across a row → down the side seam → across the next row.
- The join becomes one continuous granny-style path. You’ll connect every square’s edge without cutting yarn
Step 6 : Complete the outer round.
- Work the outer edge around all joined squares,
- for outer 4 corners work : 3dc ch2 3dc into corner ch-sp for the straight sides repeat step 2 for the inner part of the square,
- 3dc into each of the the joined ch-sp of two joined squares.
Step 7: Finish the join
- When you reach back where you started, slip stitch into the top of the first chain-3.
- Fasten off and weave in ends.
Tips
- Spacing: Always use ch-2 in corners.
- Consistency: Work into chain-spaces of granny squares. If your squares don’t have spaces, work neatly between stitches.
- Border: After joining, add one round around the whole blanket to tidy the outer edge.

Create a border for your Granny Square Blanket
Adding a border to your granny square blanket gives it a polished, finished look and helps unify your design. You can choose a simple single crochet border for a clean finish or a lacy/scalloped edge for a decorative touch. Below is a step-by-step guide for a floral-inspired border using multiple rounds.
Crochet Border Pattern
Once you have joined all the crochet squares you will start adding the border to the final blanket.
Join each new row into the first stitch after the final corner, the stitch diagram shows the pattern stitches required when working down the long straight of each side.
Row / Round 1
Join, ch2, counts as first hdc st, 1 hdc into each stitch of side - ( See diagram below for corner instructions) , 2hdc, ch2, 2 hdc into the corner chain space, 1 hdc into each stitch of side, 2hdc, ch2, 2 hdc into the corner chain space, 1 hdc into each stitch of side, 2hdc, ch2, 2 hdc into the corner chain space, 1 hdc into each stitch of side, 2hdc, ch2, 2 hdc into the corner chain space, join with slip stitch into starting chain.
Row / Round 2
Join, in 3rd stitch form corner chain space, ch3, counts as first dc leg of , 3dc-cluster in stitch, ch3, 3dc-cluster in next st, skip 4 sts, * 3dc-cluster in stitch, ch3, 3dc-cluster in next st, skip 4 sts, repeat from * along length of side - ( See diagram below for corner instructions) , 1hdc, ch2, 1hdc into the corner chain space, *3dc-cluster in stitch, ch3, 3dc-cluster in next st, skip 4 sts, repeat from * along length of side, 1hdc, ch2, 1 hdc into the corner chain space, 3dc-cluster in stitch, ch3, 3dc-cluster in next st, skip 4 sts, repeat from * along length of side, 1hdc ch2, 1 hdc into the corner chain space, * 3dc-cluster in stitch, ch3, 3dc-cluster in next st, skip 4 sts, repeat from * along length of side, 1hdc, ch2, 1 hdc into the corner chain space, join with slip stitch into starting chain.
Row / Round 3
Join, 3ch-sp, ch3, counts as first dc leg of , 6dc-shell in ch-sp, 1 sc in space between last and first 3dc-cluster st, * 6dc-shell in ch-sp, 1 sc in space between last and first 3dc-cluster st, repeat from * along length of side - ( See diagram below for corner instructions) , 6dc-shell into the corner chain space, *6dc-shell in ch-sp, 1 sc in space between last and first 3dc-cluster st, repeat from * along length of side, 6dc-shell in ch-sp, into the corner chain space, *6dc-shell in ch-sp, 1 sc in space between last and first 3dc-cluster st, repeat from * along length of side, 6dc-shell into the corner chain space, * 6dc-shell in ch-sp, 1 sc in space between last and first 3dc-cluster st, repeat from * along the length of side, 6dc-shell into the corner chain space, join with slip stitch into the starting chain.
Row / Round 4
Join, in sc st stitch form corner chain space, ch6, counts as first dc st and ch3, 1dc in same st, skip over 3dc sts, 1 sc in space between 3rd & 4th sts of 6dc-shell,* 1 dc in sc st, ch3, 1dc in same sc st, skip over 3dc sts, 1 sc in space between 3rd & 4th sts of 6dc-shell, repeat from * along length of side - ( See diagram below for corner instructions) , 1dc, ch3, 1dc, ch2, 1dc in space between 3rd & 4th sts of 6dc-shell ,* 1 dc in sc st, ch3, 1dc in same sc st, skip over 3dc sts, 1 sc in space between 3rd & 4th sts of 6dc-shell, repeat from * along length of side, 1dc, ch3, 1dc, ch2, 1dc in space between 3rd & 4th sts of 6dc-shell , * 1 dc in sc st, ch3, 1dc in same sc st, skip over 3dc sts, 1 sc in space between 3rd & 4th sts of 6dc-shell 1dc, ch3, 1dc, ch2, 1dc in space between 3rd & 4th sts of 6dc-shell , *1 dc in sc st, ch3, 1dc in same sc st, skip over 3dc sts, 1 sc in space between 3rd & 4th sts of 6dc-shell, repeat from * along length of side, 1dc, ch3, 1dc, ch2, 1dc in space between 3rd & 4th sts of 6dc-shell ,join with slip stitch into starting chain.
Row / Round 5
Join, 3ch-sp, ch3, counts as first dc leg of , 6dc-shell in ch-sp, 1 sc in sc st, *6dc-shell in ch-sp, 1 sc in sc st, repeat from * along length of side - ( See diagram below for corner instructions) , 4dc-shell into the first corner chain space, 4 dc into the next corner ch-sp, *6dc-shell in ch-sp, 1 sc in sc st, repeat from * along length of side, 4dc-shell into the first corner chain space, 4 dc into the next corner ch-sp, *6dc-shell in ch-sp, 1 sc in sc st, repeat from * along length of side, 4dc-shell into the first corner chain space, 4 dc into the next corner ch-sp, *6dc-shell in ch-sp, 1 sc in sc st, repeat from * along the length of side, 4dc-shell into the first corner chain space, 4 dc into the next corner ch-sp, join with slip stitch into the starting chain.
- If you only want a floral border you can end your border here.
- If you wish to extend your border you can continue along.
Row / Round 6
Join, in first dc st of 6dc-shell, ch2, counts as first hdc st, 1 hdc into each of the next 5 sts, skip sc st, *1hdc into each of the 6 dc shell sts, skip over sc st, repeat from *along length of side - ( See diagram below for corner instructions) , 2hdc, ch2, 2 hdc into the corner chain space, *1hdc into each of the 6 dc shell sts, skip over sc st, repeat from * along length of side, 2hdc, ch2, 2 hdc into the corner chain space, join with slip stitch into starting chain.
Row / Round 7
Join in 4th hdc st, of 6 hdc sts worked into 6dc-shell sts, ch2 counts as first hdc st, 1 hdc into the next st, 1 dc into the next 2 sts, * 1 dc in next 2 sts, 1 hdc in next 2 sts, 1 dc in next 2 sts, repeat from *along length of side - ( See diagram below for corner instructions), 1 hdc, ch2, 1hdc in corner ch-sp, * 1 dc in next 2 sts, 1 hdc in next 2 sts, 1 dc in next 2 sts, repeat from *along, 1 hdc, ch2, 1hdc in corner ch-sp, * 1 dc in next 2 sts, 1 hdc in next 2 sts, 1 dc in next 2 sts, repeat from *along, 1 hdc, ch2, 1hdc in corner ch-sp, * 1 dc in next 2 sts, 1 hdc in next 2 sts, 1 dc in next 2 sts, repeat from *along, 1 hdc, ch2, 1hdc in corner ch-sp, join with slip stitch into starting chain.
Row / Round 8
Join, ch3, counts as first dc st, 1 dc into each stitch of side - ( See diagram below for corner instructions) , 2dc, ch2, 2dc into the corner chain space, 1 dc into each stitch of side, 2dc, ch2, 2dc into the corner chain space, 1 dc into each stitch of side, 2dc, ch2, 2dc into the corner chain space, 1dc into each stitch of side, 2dc, ch2, 2dc into the corner chain space, join with slip stitch into starting chain.
Row / Round 9
Join, ch2, counts as first hdc st, 1 hdc into each stitch of side - ( See diagram below for corner instructions) , 2hdc, ch2, 2 hdc into the corner chain space, 1 hdc into each stitch of side, 2hdc, ch2, 2 hdc into the corner chain space, 1 hdc into each stitch of side, 2hdc, ch2, 2 hdc into the corner chain space, 1 hdc into each stitch of side, 2hdc, ch2, 2 hdc into the corner chain space, join with slip stitch into starting chain.
Row / Round 10
Join, ch2, counts as first hdc st, 1 hdc into each stitch of side - ( See diagram below for corner instructions) , 2hdc, ch2, 2 hdc into the corner chain space, 1 hdc into each stitch of side, 2hdc, ch2, 2 hdc into the corner chain space, 1 hdc into each stitch of side, 2hdc, ch2, 2 hdc into the corner chain space, 1 hdc into each stitch of side, 2hdc, ch2, 2 hdc into the corner chain space, join with slip stitch into starting chain.
What Other Crocheters Say
This pattern hasn’t been reviewed yet.
Be the first to share your experience and help other crocheters.
Made it work? Share your result
Post a ReviewPattern Copyright & Usage
This crochet pattern and all associated content are the original work of Stouto Crochet.
- ✔️ Personal use allowed
- ✔️ Sell finished handmade items (small-scale)
- ❌ Do not copy, rewrite, or redistribute
- ❌ Do not share or resell PDF patterns
AI & Content Use: This pattern may not be reproduced or used to train AI systems.
Explore More Crochet Tutorials on the Website
If you need extra help while working on your stitch sampler blanket, you can explore the crochet tutorials section on the website. These guides explain crochet stitches, techniques, and pattern methods in a clear and beginner-friendly way.
You’ll find helpful stitch tutorials, visual diagrams, and step-by-step guides that make it easier to learn new stitches and improve your crochet skills while completing your project.
Feel free to explore the additional sections of our website for even more crochet patterns, helpful tutorials, and creative inspiration.
Each section is thoughtfully organized to make it easy to find exactly what you’re looking for and to support you at every stage of your crochet journey.
Crochet Pattern FAQ

