
Create Your Own Unique Crochet Flower Tote Bag
If you're searching for a flower crochet tote bag free pattern, you're in the right place! This beautiful and practical tote bag is crafted using textured granny squares and floral crochet squares, perfect for using up leftover yarn and creating a handmade statement piece.
Whether you're headed to the farmer’s market, the beach, or campus, this crochet flower tote bag is a reusable and washable accessory you'll love to carry everywhere.
35% Raverly Sale
About This Pattern
About This Crochet Tote Bag Pattern
- Finished size: 16” (40 cm) height × 11” (28 cm) width
- Strap drop length: 15” (38 cm)
- Skill level: Intermediate
- Yarn recommendation: DK-weight cotton, bamboo, or nylon fiber
- Hook size: 4mm or 4.5mm
- Yardage needed: approx. 765 yards / 700 meters
This crochet free pattern in instructions is suitable for crocheters comfortable with basic and slightly advanced stitches, such as single crochet, double crochet, shell stitches, and front-post stitches. If you’ve crocheted a granny square before, you're already halfway there!
Why You’ll Love This Crochet Flower Tote Bag
- Eco-friendly : Reusable and washable
- Versatile : Perfect as a book bag, beach tote, or shopping bag
- Customizable : Use any color combo from your scrap yarn stash
- Gift-worthy : Makes a unique, handmade gift for students or friends
- Sturdy : Designed using tightly spun cotton or bamboo yarn for durability
Materials You’ll Need
- DK weight yarn (approx. 765 yards)
- 4mm or 4.5mm crochet hook
- Tapestry needle
- Stitch markers (optional)
- Scissors
Tip: Stick to one yarn weight to ensure consistent square sizing. Mixing worsted and 4-ply yarns will throw off the square dimensions and make joining difficult.
How Many Squares Do I Need?
This flower crochet tote bag pattern includes:
- 2 large floral crochet squares
- 10 smaller textured flower squares
- Total: 12 crochet granny squares
These are then joined to form the front, back, and sides of your tote bag.
Can I Use Scrap Yarn Balls?
Absolutely! This is a fun tote bag pattern for using up scrap yarn. Just be sure to:
- Keep yarn weights consistent
- Stick to cotton, bamboo, or another strong fiber
- Avoid slippery yarns like silk or rayon for durability
Crochet Techniques Used
- Working in the round
- Magic ring
- Chain (ch), single crochet (sc), half double crochet (hdc), double crochet (dc)
- Slip stitch (sl st), front post stitches, and shell stitches
- Joining squares
- Fastening off and changing colors
This tote bag pattern includes plenty of per-row photo tutorials and diagrams, especially useful for joining squares and assembling the bag.
Ways to Use Your Flowered Crochet Tote Bag
- Everyday carryall
- Market bag or eco-friendly shopper
- Book bag for students
- Beach tote for summer weekends
- Stylish gift for crochet lovers
Plus, if you love the square designs, you can reuse them in other projects, like a flower crochet blanket or cushion cover!

What can I use my Flower Crochet bag for ?
The finished tote bag size is large enough to make a great travel bag, the large textured crochet flower in the center of the bag, makes this not only a statement piece but also a reusable bag, helping you do your bit for our planet.
Crochet Tote bags make great gifts for students at college as they are durable and strong and can easily double up as a book bag and beach bag over the weekends.
This easy crochet pattern will have you making beautiful crochet bags in no time.

Large Flower Granny square
How many squares do I need to make this flower crochet tote bag ?
The Crochet flower tote bag pattern is made with 12 crochet flower square patterns, 2 Large floral crochet squares, and 10 smaller textured smaller flower squares.
How much yarn do I need for this crochet bag pattern ?
When making this bag you will require roughly 700 meters or 765 yards of strong fiber yarn.
For the main color of the bag, you will need the most amount of yarn, but this is not set in stone, you can make each crochet square a different color combination

Fun tote bag pattern for using up scrap balls of yarn
Can I use scrap yarn balls for this flower crochet tote bag ?
Yes you can, you can mix and match small balls of colored yarn together for the smaller crochet flowers, and use up some of your large leftover yarn balls for the larger crochet flower squares, but do note to keep the yarn use, especially when using scrap yarn balls, as close in weight as possible, this means is you start of with worsted weight yarn ,keep using worsted weight yarn, this pattern won't work to well if you change up between 4ply and worsted as your sizing will be completely off and your square will end-up bulging and your finished squares won't be the same size, and the final join of the bag wont work.

What type of yarn do you recommend for this flower crochet tote bag ?
I suggested a strong yarn fiber for any crochet tote bag, something like craft cotton, or strong bamboo or even some Nylon, as this create a string fabric, pick yarn which is tightly spun, and holds a knot, if your yarn it to slippery, your knots won't hold, and your bag wll unravel in time, for more detailed info on what yarn is best for crochet bags see page : Crochet Bag Patterns
What type of crochet stitches will I use in this crochet tote bag ?
The beauty of crochet flower squares, if mixed in crochet stitches per row, gives each crochet flower its beautiful texture and feel. For this pattern you should be able to understand basic crochet terminology like, chain, chain space, single crochet, half double crochet, double crochet, slip-stitch, how to use the space of a ch-sp, and thow to work between stitches.
It also has some more advanced stitches and terminology like, front post half double and double crochet stitches, crochet shell stitches, but not to worry , you can easily follow along with the per row photos included in the downloadable crochet pattern.
What other crochet skills do I require to understand and complete this pattern ?
Well, you will need to understand the crochet basics of working in the round, understand how to make a magic ring and how to finish off your yarn after each row, and also to know how to join a new color for your next row, in shirt if you have made a normal granny square and was able to make each row a different color then you would be able to give this pattern a try.
What Crochet Techniques are used in this crochet pattern ?
You need to make 12 crochet squares in total, and all crochet squares are worked in the round, ensure, that your final row count per side is correct or you will struggle to join your block at a late stage. Once you have completed the squares and straps you will move on to joining the bag, so familiarize yourself with the diagrams included with the pattern, as soon as possible, as it helps with joining up the crochet bag, the pattern has a lot of photo references and loads of additional written help, to assist you as best possible.
You will need to know the basics of joining squares together, but some additional notes on joining are available in the pattern.

Do you have some tips before I start this pattern ?
Yes, here are a few quick tips you should take note off before starting this pattern.
- It is best to stick to the same yarn weight and crochet hook throughout making your squares, or your squares will not match up.
- Make sure all your finished sides of your square have the same stitch on each side, count as you go along the pattern, if your stitch count is out on one side, then you might have missed some stitches, rather go back and fix the row, if you only start counting at the end of each crocheted square you will have a lot more frogging to do.
- Ensure that all squares have the final stitch count, this will make things go way easier when it comes to joining the crochet pattern.
- Work in the end, as you go will help you at the end when it comes to finishing the blanket unless you love spending a day at least to work on loose ends.
- If you have any other questions you would like answered for this pattern, please pop me a message and I will happily add more information here.
Can I use the flower crochet squares of this tote bag in a flower crochet blanket instead ?
Yes, you can use the crochet squares for a blanket as I have designed both the large and small crochet squares to fit together so that they can be joined.
So if you would rather opt for a crochet flower blanket rather than a crochet square bag, feel free to do so, but please don't use my designs as your own blanket pattern or resell them as your pattern.
Explore More Large Granny Square Patterns
Love making statement blankets?
Browse our collection of large granny square patterns each one full of color, texture, and creativity. Whether you prefer floral motifs, geometric designs, or classic layouts, there’s a project waiting to inspire your next crochet adventure.
View All Large Granny Square Patterns →
I am always trying to make new patterns and designs, but the actual time it takes to design, write, and make an actual crochet item, can take me anything from one to two months to up to a year, as I will redo, remake, fit measure and calculate until I am happy with the way it looks and feel. Then I need to ensure that the pattern works out in size and measurements, not even to mention the days and months it takes to add a full photo tutorial, after which I then have to methodically compile this into a usable easy to understand terminology correct document, and then publish into multiple formats so that it has a downloadable pdf pattern as well as some free online versions. Getting patterns out to the public takes large chunks of time, blood, sweat, finger, and hand calluses, and sometimes loads of tears, so please link back to this page, and if you love my pattern, purchase it. It assists me in creating more patterns for you to love and easily enjoy.
If you are keen to crochet some of my patterns that has note seen the light please feel free to contact me as we can always arrange something.


Materials & Tools
| Hook | 4.5mm Crochet Hooks |
|---|---|
| Yarn Weight | Worsted Yarn |
| Fibre Type | Cotton–Acrylic Blends |
| Other Tools | |
| Yarn Needed | +- 765m/ 700yards |
| Finished Size | 16’ / 40 cm - See size information |
- Difficulty level: Intermediate
- Suggested yarn for crochet tote bag pattern.
- DK Cotton, Bamboo, or Nylon Fibre content yarn
- Yarn Length required : +- 765m/ 700yards
- Recommended Crochet hook size: 4mm or 4.5 mm
Select the hook recommended by your selected yarn.
The final measurement is based on the pattern worked in the following hook sizes using different types of cotton yarn

Yarn Calculator
Not sure how much yarn you'll need for your next crochet project?
Use our yarn calculator to estimate the amount of yarn required based on your project size, yarn weight, and stitch pattern.
It's a quick and easy way to plan your materials before you start crocheting.
Pattern Instructions
Project Size Information
Height of bag : 16’ / 40 cm
Width of bag : 11’ / 28 cm
Strap drop length : 15’ / 38 cm
Written Instructions
Step-by-Step Beginner Guide: Large Granny Flower Bag Squares
Gather Your Materials
- Yarn in your chosen colors (recommended: DK or worsted).
- Crochet hook (size recommended on yarn label or in pattern).
- Scissors and yarn needle.
- Stitch markers (optional, but helpful for corners and joins).
Learn the Stitches Used
Before starting, make sure you’re comfortable with:
- Magic ring
- Chain (ch)
- Slip stitch (sl st)
- Single crochet (sc)
- Half double crochet (hdc)
- Double crochet (dc)
- Front post half double crochet (fphdc)
- Front post double crochet (fpdc)
- Back loop only (BLO)
- Shell stitch (6 dc in same stitch or space)
Start with the Center Flower
- Begin with a magic ring this forms a neat closed center.
- Work Row 1 exactly as written for both the large and small squares.
- After completing Row 1, gently pull your yarn tail to close the ring tightly.
Build the Flower Rounds
- Rows 2–5 (or 2–4 for small squares) create the flower petals and the round shape.
- Each color change defines a new petal layer fasten off neatly at the end of each color and weave in later.
- You’ll notice texture forming from shell stitches and front post stitches. These help shape the flower’s raised petals.
Transition to Square Shape
- Starting around Row 6 or 7, the pattern changes from round to square.
- The chain-5 and front post stitches define the corners.
- It’s helpful to place stitch markers in each corner space (ch-2 sp) as you work — this makes joining easier later.
Add the Final Rounds
- Rows 8–11 (large square) add height and structure.
- Keep sides even by counting stitches after each round this keeps your square perfectly shaped.
- Always join with a sl st into the top of your starting chain to finish each round.
Make Two Large Squares & Ten Small Squares
- Work Large Granny Flower Squares (one front, one back).
- Crochet 10 Small Flower Squares for decoration or bag sides.
Finishing Touches
- Weave in all ends neatly on the back.
- Lightly block squares (pin to shape, mist with water, let dry flat).
- Assemble your bag according to layout sew or crochet join squares together.
- Add a lining, strap, or closure if desired.
To keep colors consistent, plan your palette before starting alternate light and dark shades for strong floral contrast.
Tips Before You Start
- Count your stitches after every round to keep all squares uniform
- Weave in ends as you go to save time later
- Double-check final square dimensions before joining
- Familiarize yourself with the joining diagram provided in the pattern
Want to Use These Squares in a Blanket?
Yes, you can! The floral squares from this flower crochet tote bag pattern were designed to fit together seamlessly, making them ideal for a granny square flower blanket. Just don’t resell the pattern as your own, link back to this page if you share your projects online.
Make Your Own Flower Crochet Tote Bag Today
With just yarn, a hook, and a bit of time, you can craft a beautiful, eco-conscious, and practical tote bag. This easy granny square crochet tote bag pattern is perfect for all seasons, and best of all, it’s free to follow along.
Download the PDF pattern if you'd like a permanent copy, or dive right in using this page. Either way, you’ll have a stunning, handmade flower crochet tote bag in no time.
Support the creator
Purchasing the PDF pattern helps fund new pattern releases and supports indie crochet designers.
Quick Stitch Guide
All stitch instructions are available in both US Crochet Terminology and UK Crochet Terminology, making it easy to follow along using the terms you are most familiar with.
If you are new to any of the stitches used in this pattern, we recommend reviewing the relevant stitch guide before starting. Each guide includes step-by-step instructions, helpful tips, and stitch terminology conversions where applicable.
Take your time, practice any unfamiliar stitches, and most importantly—enjoy the process of creating your blanket one row at a time.
UK : 6trsh - 6 treble crochet shell
AFR : 6lb-skulp - 6 Langbeentjie Skulp
1. Work 6 dc into same stitch/space.
2. Skip pattern-specified sts, repeat.
UK : BLO - Back loop only
AFR : als - Agterste Lus / agterlus alleen
1. Insert hook under the back loop only (farthest from you).
2. Complete the stitch as normal.
UK : bphtr - Back post half treble crochet
AFR : abhlb / ashlb - Agterste been Halwe Langbeen / Agter stam Halwe Lang Been/ afterpaal half-dubbelhekel
1. Yarn over, insert hook back→front→back around post.
2. Yarn over, pull up loop (3 loops).
3. Yarn over, pull through all 3 loops.
UK : ch - chain
AFR : ks - ketting steek
Make a slipknot, yo, pull through loop. Repeat for desired chains.
UK : ch-sp - chain space
AFR : Ks sp - Kettingsteek spasie
1. Make a slip knot on the hook.
2. Yarn over (yo).
3. Pull yarn through the loop on the hook. → 1 ch made.
4. Repeat for desired number of chains.
UK : tr - treble crochet
AFR : lb - Langbeentjie / dubblehekel
1. Yarn over.
2. Insert hook into stitch, pull up a loop (3 loops).
3. Yarn over and pull through first 2 loops (2 remain).
4. Yarn over and pull through last 2 loops.
UK : FLO - front loop only
AFR : vslalleen - Voorste lus alleenlik
1. Identify top loops of the stitch (front is closest to you).
2. Insert hook under the front loop only.
3. Work the stitch (sc/hdc/dc) as normal through that loop.
UK : fpdc - Front post double crochet
AFR : vbkb / vskb - Voorste Kortbeen(tjies) / Voor Stam Kortbeen(tjies) / voorpaal enkelhekel
1. Insert hook front→back→front around the post of stitch below.
2. Yarn over, pull up loop (2 loops).
3. Yarn over, pull through both loops.
UK : htr - half treble crochet
AFR : hlb - Halwe Langbeentjie / Half Lang Been / half-dubblehekel
1. Yarn over.
2. Insert hook into next stitch and pull up a loop (3 loops).
3. Yarn over and pull through all 3 loops.
UK : rep from * - repeat from *
AFR : her * - Herhaal van *
1) Find the *.
2) Work the instructions after it.
3) When told, go back to * and repeat the sequence the required number of times.
4) Stop when the pattern says.
UK : dc - double crochet
AFR : kb - kortbeen / kortbeentjies / enkelhekel
1. Insert hook into the next stitch.
2. Yarn over and pull up a loop (2 loops on hook).
3. Yarn over and pull through both loops. → 1 sc complete.
UK : sl st - slip stitch
AFR : gls - glysteek
1. Insert hook into the stitch or space.
2. Yarn over and pull through the stitch and the loop on your hook (one motion).
3. Used to join rounds or move without height.
Pattern Reference
This page is part of a larger crochet pattern and is intended as a companion tutorial or stitch reference. For complete instructions, materials, sizing information, and all pattern sections, please visit the main pattern page.Step by Step
⚠️ This pattern is for personal use only. Please do not copy or redistribute.

Large Granny Flower Square Pattern US (UK:Terms)
Make 2 squares : one for the front and one for the back of the bag.
Start
Begin with a magic ring.
Row 1
Ch 1, 1 sc (UK : dc) into magic ring.
Ch 4 (counts as 1 dc (UK : tr) + ch 1).
1 dc (UK : tr) into same st.
*1 dc (UK : tr), ch 1, 1 dc (UK : tr) into magic ring.*
Repeat 7 more times.
Join with sl st (UK : sl st) into top of beginning ch.
Fasten off color.
24 sts total (8 sets of [1 dc (UK : tr), ch 1, 1 dc (UK : tr)])
Row 2
Join new color in any ch-1 space.
Ch 3 (counts as 1 dc (UK : tr)), 1 dc (UK : tr), ch 2, 2 dc (UK : tr) in same space.
*2 dc (UK : tr), ch 2, 2 dc (UK : tr) in next ch-1 space.*
Repeat around.
Join with sl st (UK : sl st) into top of ch 3.
Fasten off color.
48 sts total (8 sets of [2 dc (UK : tr), ch 2, 2 dc (UK : tr)])
Row 3
Join new color.
*1 sc (UK : dc) in space between 2 dc groups, 6 dc (UK : tr) in next ch-2 space.*
Repeat around.
Join with sl st (UK : sl st) into first sc (UK : dc).
Fasten off color.
56 sts total (8 sets of [1 sc (UK : dc), 6 dc (UK : tr)])
Row 4
Join new color in back loop only (BLO) of 3rd dc (UK : tr) of any 6-dc shell.
*1 BLO sc (UK : dc) in 3rd dc (UK : tr) of shell, ch 1, 1 BLO sc (UK : dc) in next st,
(1 dc (UK : tr), ch 1, 1 dc (UK : tr), ch 1, 1 dc (UK : tr)) in sc (UK : dc) between shells.*
Repeat around.
Join with sl st (UK : sl st) into first sc (UK : dc).
Fasten off color.
64 sts total (8 repeats)
Row 5
Join new color in any ch-1 space.
*1 sc (UK : dc) in ch-1 space, 6 dc (UK : tr) shell in next ch-1 space.*
Repeat around.
Join with sl st (UK : sl st) into first sc (UK : dc).
Fasten off color.
84 sts total (12 repeats)
Row 6
Join new color around sc (UK : dc) from previous row.
*1 fphdc (UK : fphtr) around sc (UK : dc) post, BLO 1 hdc (UK : htr) in each of the 6 dc (UK : tr) from previous row.*
Repeat around.
Join with sl st (UK : sl st) into first fphdc (UK : fphtr).
Fasten off color.
84 sts total (12 repeats)
Row 7
Join new color in space before fphdc (UK : fphtr).
*In space before fphdc (UK : fphtr): 1 dc (UK : tr), ch 1, 1 dc (UK : tr), ch 2,
In space after fphdc (UK : fphtr): 1 dc (UK : tr), ch 1, 1 dc (UK : tr),
ch 5, skip 6 hdc (UK : htr), 1 fphdc (UK : fphtr) around next fphdc (UK : fphtr),
ch 5, skip 6 hdc (UK : htr), 1 fphdc (UK : fphtr) around next fphdc (UK : fphtr),
ch 5, skip 6 hdc (UK : htr).*
Repeat 3 more times to form a square.
Join with sl st (UK : sl st) into top of first dc (UK : tr).
Fasten off color.

Row 8
Join new color in corner ch-2 space.
*(2 dc (UK : tr), ch 2, 2 dc (UK : tr)) in corner space,
1 fphdc (UK : fphtr) around dc (UK : tr), 1 hdc (UK : htr) in next ch-1 space,
1 fphdc (UK : fphtr) around next dc (UK : tr),
BLO 1 dc (UK : tr) in next hdc (UK : htr) from Row 6,
BLO 1 hdc (UK : htr) in next 5 hdc (UK : htr) from Row 6,
1 fphdc (UK : fphtr) around next fphdc (UK : fphtr),
BLO 1 hdc (UK : htr) in next 6 hdc (UK : htr) from Row 6,
1 fphdc (UK : fphtr) around next fphdc (UK : fphtr),
BLO 1 hdc (UK : htr) in next 5 hdc (UK : htr) from Row 6,
BLO 1 dc (UK : tr) in next hdc (UK : htr) from Row 6,
1 fphdc (UK : fphtr) around next dc (UK : tr),
1 hdc (UK : htr) in next ch-1 space,
1 fphdc (UK : fphtr) around next dc (UK : tr).*
Repeat 3 more times for each side.
Join with sl st (UK : sl st) into top of first dc (UK : tr).
Fasten off color.
136 sts total (4 sides × 32 sts + corners)
Row 9
Join new color in corner ch-2 space.
*(2 hdc (UK : htr), ch 2, 2 hdc (UK : htr)) in corner space,
1 hdc (UK : htr) in next 2 sts,
1 fpdc (UK : fptr) around fphdc (UK : fphtr), 1 hdc (UK : htr) in next st,
1 fpdc (UK : fptr) around next fphdc (UK : fphtr), 1 hdc (UK : htr) in next 6 sts,
1 fpdc (UK : fptr) around fphdc (UK : fphtr), 1 hdc (UK : htr) in next 6 sts,
1 fpdc (UK : fptr) around fphdc (UK : fphtr), 1 hdc (UK : htr) in next 6 sts,
1 fpdc (UK : fptr) around fphdc (UK : fphtr), 1 hdc (UK : htr) in next st,
1 fpdc (UK : fptr) around next fpdc (UK : fptr),
1 hdc (UK : htr) in next 2 sts.*
Repeat 3 more times.
Join with sl st (UK : sl st) into top of first dc (UK : tr).
Fasten off color.
144 sts total (4 sides × 34 sts + corners)
Row 10
Join new color in corner ch-2 space.
*(2 dc (UK : tr), ch 2, 2 dc (UK : tr)) in corner space,
1 dc (UK : tr) in each st across side.*
Repeat 3 more times.
Join with sl st (UK : sl st) into top of first dc (UK : tr).
Fasten off color.
160 sts total (4 sides × 38 sts + corners)
Row 11
Join new color in corner ch-2 space.
*(2 dc (UK : tr), ch 2, 2 dc (UK : tr)) in corner space,
1 dc (UK : tr) in each st across side.*
Repeat 3 more times.
Join with sl st (UK : sl st) into top of first dc (UK : tr).
Fasten off color.
176 sts total (4 sides × 42 sts + corners)

Finished Large Granny Flower Square.
Make 2 total one for the front and one for the back of the bag.

Small Flower Square Pattern
Make 10 squares for your project.
Start
Begin with a magic ring.
Row 1
Ch 1, 1 sc (UK : dc) into magic ring.
Ch 4 (counts as 1 dc (UK : tr) + ch 1).
1 dc (UK : tr) into same st.
*1 dc (UK : tr), ch 1, 1 dc (UK : tr) into magic ring.*
Repeat 7 more times.
Join with sl st (UK : sl st) into top of beginning ch.
Fasten off color.
24 sts total (8 sets of [1 dc (UK : tr), ch 1, 1 dc (UK : tr)])
Row 2
Join new color in any ch-1 space.
Ch 3 (counts as 1 dc (UK : tr)), 1 dc (UK : tr), ch 2, 2 dc (UK : tr) in same space.
*2 dc (UK : tr), ch 2, 2 dc (UK : tr) in next ch-1 space.*
Repeat around.
Join with sl st (UK : sl st) into top of ch 3.
Fasten off color.
48 sts total (8 sets of [2 dc (UK : tr), ch 2, 2 dc (UK : tr)])
Row 3
Join new color.
*1 sc (UK : dc) in space between 2 dc groups, 6 dc (UK : tr) in next ch-2 space.*
Repeat around.
Join with sl st (UK : sl st) into first sc (UK : dc).
Fasten off color.
56 sts total (8 sets of [1 sc (UK : dc), 6 dc (UK : tr)])

Row 4
Join new color around fphdc (UK : fphtr) from previous row.
*1 fphdc (UK : fphtr) around fphdc post, BLO 1 hdc (UK : htr) in each of the 6 dc (UK : tr) from previous row.*
Repeat around.
Join with sl st (UK : sl st) into first fphdc (UK : fphtr).
Fasten off color.
56 sts total (8 sets of [1 fphdc (UK : fphtr), 6 hdc (UK : htr)])
Row 5
Join new color in space before fphdc (UK : fphtr).
*In space before fphdc: 1 dc (UK : tr), ch 1, 1 dc (UK : tr), ch 2,
In space after fphdc: 1 dc (UK : tr), ch 1, 1 dc (UK : tr),
ch 4, skip 6 hdc (UK : htr), 1 fphdc (UK : fphtr) around next fphdc (UK : fphtr),
ch 4, skip 6 hdc (UK : htr).*
Repeat 3 more times to form a square.
Join with sl st (UK : sl st) into top of first dc (UK : tr).
Fasten off color.
Row 6
Join new color in corner ch-2 space.
*(2 hdc (UK : htr), ch 2, 2 hdc (UK : htr)) in corner space,
1 fphdc (UK : fphtr) around dc (UK : tr), 1 hdc (UK : htr) in next ch-1 space,
1 fphdc (UK : fphtr) around next dc (UK : tr),
BLO 1 dc (UK : tr) in next hdc (UK : htr) from Row 4,
BLO 1 hdc (UK : htr) in next 4 hdc (UK : htr) from Row 4,
skip last hdc (UK : htr) from Row 4, 1 fphdc (UK : fphtr) around fphdc (UK : fphtr),
skip first hdc (UK : htr) from Row 4, BLO 1 hdc (UK : htr) in next 4 hdc (UK : htr) from Row 4,
BLO 1 dc (UK : tr) in next hdc (UK : htr) from Row 4,
1 fphdc (UK : fphtr) around dc (UK : tr), 1 hdc (UK : htr) in next ch-1 space,
1 fphdc (UK : fphtr) around next dc (UK : tr).*
Repeat 3 more times for each side.
Join with sl st (UK : sl st) into top of first hdc (UK : htr).
Fasten off color.
136 sts total(4 sides × 21 sts + corners)
Finished Small Flower Square.
Make 10 total for your project.

Join together a square tote bag
Make 10 small squares and 2 large squares.
Start with 8 x small squares and 1 x large square as per the image below, to see detailed information about placement see the figure below photo.
Square placement for the front of the bag
- S1: 1 x Large Square for front
- S2: 2 x Top Small squares for the front
- S3: 6 x SideSmall squares for front and back
Square placement for the back of the bag
- S1: 1 x Large Square for the back
- S2: 2 x Top Small squares for the back
- S3: same squares folded over and used for back


Place two squares on top of one another, right side facing in.
Join yarn into both squares, with a slip stitch, 1 single crochet stitch over slip stitch to secure yarn. Work 1 single crochet stitch from the corner space into each stitch of both crochet squares.
If you are more comfortable using a yarn needle and yarn you can join squares with a simple needle work stitch.
Join 2 squares on a single side, then finish off the yarn.


Join squares in the following order
Start with joining small squares together,
- Join Square B to C,
- Join Square D to E,
- Join Square G to F,
- Join Square H to K,

- Join joined squares (B+C) to square A
- Join joined squares (D+E) to square A
- Join joined squares (G+F) to square A
- Join joined squares (H+K) to square A
- Join Square M to H,
- Join Square L to C,
Fold the following squares inwards, and join only side indicated in points 11 and 12 as indicated below.

Fold over squares G and F, join sides marked with green 11
Fold over squares G and F, join sides marked with green 11

Turn the work inside out, fold over squares and place required squares on top of one another, right side facing in.
Join yarn into both squares, with a slip stitch, 1 single crochet stitch over slip stitch to secure yarn. Work 1 single crochet stitch from the corner space into each stitch of both crochet squares.
If you are more comfortable using a yarn needle and yarn you can join squares with a simple needle work stitch.
Join 2 squares on a single side, then finish off the yarn.
Fold the following squares inwards, and join only side indicated in points 11 and 12 as indicated below.
Fold over square M to lay flat on the right side facing inwards on top of square K, dont join
Fold over square B to lay flat on the right side facing inwards on top of square L, dont join.

The shape of the bag will now be visible.
Join the remainder large square in the same manner as points 5 to 8 mentioned above work in ends.

Finishing off the top of bag
Join yarn in the left chain space of two chains spaces where large and small squares join at the top of the bag.
Ch2, 2 dc into ch-sp, 2dc into same ch-sp,1dc into each stitch until next chsp.
2dc, ch2. 2 dc into next chsp. ( top of small square),1dc into each stitch until the next ch-sp, 2dc in ch-sp, ch2. 2 dc into next ch-sp, 1dc into each stitch until the next ch-sp, 2dc, ch2. 2 dc into next chsp. ( top of small square),1dc into each stitch until the next ch-sp, 2dc in ch-sp, ch2. 2 dc into next ch-sp. 1dc into each stitch until the next ch-sp, 2dc, ch2. 2 dc into next chsp. ( top of small square), 1dc into each stitch until the next ch-sp, 2dc in ch-sp, ch2. 2 dc into next ch-sp, 1dc into each stitch until the next ch-sp, 2dc, ch2. 2 dc into next chsp. ( top of small square), 1dc into each stitch until the next ch-sp, 2dc in ch-sp, join with slip stitch in staging chain, finish off yarn. Work ends.

Finishing off the Tote bag is pretty easy, simply follow instructions below
Make Handles
Row 1
Chain 122, 1 hdc into 2nd chain from hook, 1 hdc into next 119 st(s) till end of row, (120 st(s) in row, ) ch 1, turn
Row 2
ch1, 1 hdc into next 119 st(s) till end of row, ( 120 st(s) in row, ) finish off color, work in ends.
Row 3
Join new color in top corner stitch, ch2, (counts as first hdc ), 1 hdc into next 119 st(s) till the end of the row, work 2 hdc into a corner, 1 hdc into next st, 2 hdc into a corner, and 1 hdc into each of the stitches, working back on the initial chain row, work 2 hdc into the corner, 1 hdc into next st, 2 hdc into a corner, join with slip st into starting chain.
Row 4
Join new color in corner stitch, work 2 hdc into a corner, 1 hdc into next 2 sts, 2 hdc into a corner, and 1 hdc into each of the stitches, of the straight strip, 2 hdc into a corner, 1 hdc into next 2 sts, 2 hdc into a corner, and 1 hdc into each of the stitches, of the straight strip, join with slip st into starting chain.
Finish off, work in ends, and the handle is now complete

Joining straps to bag
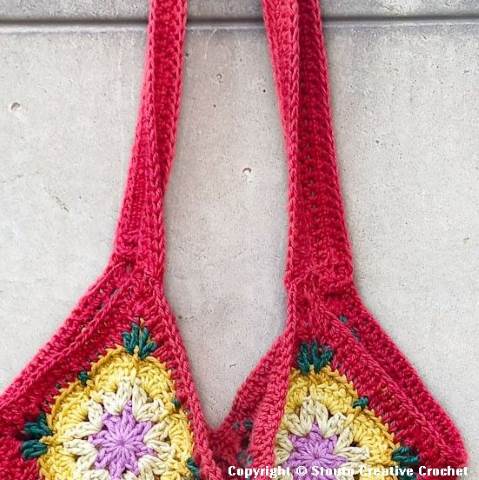
Join straps to the top of the bag with a yarn needle and yarn. Place the strap behind the top left square, and work with small stitches in between crochet stitches. The placement of the strap is completely up to you. You can either work one strap to the two front squares and the next to the two back squares. And have your bag open towards the front. Or you can join the strap to the front left and back left of either the left or right panel for the bag to open sideways.

What Other Crocheters Say
This pattern hasn’t been reviewed yet.
Be the first to share your experience and help other crocheters.
Made it work? Share your result
Post a ReviewPattern Copyright & Usage
This crochet pattern and all associated content are the original work of Stouto Crochet.
- ✔️ Personal use allowed
- ✔️ Sell finished handmade items (small-scale)
- ❌ Do not copy, rewrite, or redistribute
- ❌ Do not share or resell PDF patterns
AI & Content Use: This pattern may not be reproduced or used to train AI systems.
Explore More Crochet Tutorials on the Website
If you need extra help while working on your stitch sampler blanket, you can explore the crochet tutorials section on the website. These guides explain crochet stitches, techniques, and pattern methods in a clear and beginner-friendly way.
You’ll find helpful stitch tutorials, visual diagrams, and step-by-step guides that make it easier to learn new stitches and improve your crochet skills while completing your project.
Feel free to explore the additional sections of our website for even more crochet patterns, helpful tutorials, and creative inspiration.
Each section is thoughtfully organized to make it easy to find exactly what you’re looking for and to support you at every stage of your crochet journey.
Crochet Pattern FAQ
Is this flower crochet tote bag pattern free?
Yes! The complete Flower Crochet Tote Bag pattern is available to follow for free on the Stouto Crochet website. If you prefer to crochet offline, you can also purchase an ad-free printable PDF version.
Is this an easy crochet tote bag pattern?
This pattern is suitable for adventurous beginners and intermediate crocheters. You should be comfortable with basic crochet stitches, working in the round, and joining granny squares.
What crochet stitches are used?
The tote bag uses common crochet stitches including:
- Chain (ch)
- Slip Stitch (sl st)
- Single Crochet (sc)
- Half Double Crochet (hdc)
- Double Crochet (dc)
- Treble Crochet (tr)
What yarn is best for this crochet tote bag?
Cotton yarn is recommended because it is durable, washable, and holds its shape well. You can also substitute other yarns of a similar weight, but the finished size may vary.
What crochet hook size do I need?
The pattern includes the recommended hook size and gauge. If your gauge differs, you may need to use a larger or smaller hook to achieve the correct finished size.
Can I make the tote bag larger or smaller?
Yes. You can easily customize the size by making additional flower granny squares or adjusting the strap length to suit your needs.
How many granny squares are needed?
The pattern explains exactly how many flower granny squares are required and shows how to join them together to create the finished tote bag.
Is this a printable PDF crochet pattern?
Yes. A premium PDF version is available for purchase. It includes the complete pattern in a printer-friendly format without advertisements.
Can I sell bags made from this pattern?
Yes. You may sell finished tote bags handmade by you. However, the pattern itself may not be copied, redistributed, or resold.
Is the pattern written in US or UK crochet terms?
The pattern includes both US and UK crochet terminology, making it easy for crocheters around the world to follow.

